Our everyday cloth napkins were looking pretty ragged so I’ve been on the hunt for new ones. Thrift stores are a great place to find napkins, and you can usually tell if they need to be ironed with every wash–the ones that require ironing are usually starched and super stiff. The bad news there is that we don’t have too many thrift stores that sell home goods near us. So, I wonder what I did…
After seeing how expensive cloth napkins are to buy new, I decided to make some. I ended up getting a pre-cut bundle of Purl Soho cotton toweling. I settled on two bundles of precut pieces during a sale, knowing I could get two napkins from each piece, which worked out to ~$9/napkin. Whoever thinks making stuff yourself saves you money, well… you can but I do not!
The napkins are on the small side, but they are very soft and thick. The mitered corners help a lot to reduce the bulk. It took a few attempts to figure out the best folding method because of the stripes and odd size, but I’ve settled on folding in thirds, then in half, and it looks very nice. After washing and drying, they are WRINKLE-FREE. Living the dream.
I may have gone a little wild. In the past month I have made 3 Arkies, including 1 for Jacob, and 2 pairs of Bailee shorts. Tessuti advertises these as a matching set, so I wanted to give it a go to make this work as a set of not-pajamas.
I fell for the idea of making this out of Merchant and Mills’ Louisiana linen for our trip to the west coast. While I was at it, I thought I would adapt Arkie for Jacob so he could be part of the fun, his is made out of Sweeps Scrim with coordinating cotton buttons.
The matching plaid top/shorts set turned out fantastic. I used the same construction mods as my first version. The fabric is dreamy, and I have been wearing them a set and as separates nonstop during this late-summer heat wave.
Here’s how I adapted the top for Jacob: I went up two sizes and took in about 4″ width at the hips. I also lengthened the body 2″ and the sleeves an inch. If I make this again, I want to make the shoulder area a bit more roomy, perhaps by dividing the back piece into a yoke and a lower back body with a pleat? Overall, though, Jacob’s version turned out great.
I had just enough linen leftover from Jacob’s shirt to squeeze in a second pair of Bailee shorts. At first glance, this shorts pattern doesn’t seem that unique, but they have nice details and I really like how they fit me.
Last week I had a camp collar shirt curiosity that morphed into a frequency illusion. This type of shirt has been around for ages, but it has become quite trendy. While I was making this my husband commented that he saw an “article” about the sudden popularity of the Kramer shirt.
After this shirt style was on my mind for a couple of days, I started looking for a pattern to use to make my own. I found out this type of collar goes by many names: revere collar, cuban collar, camp collar among others. My go-to of “camp collar” is not the most universal, so I had trouble finding patterns. I finally thought to check Tessuti. Not sure if it was my subconsious or what but they released the Arkie Shirt this year, and it fit my vision perfectly!
Fabric and buttons
I wanted to use stashed fabric only for this first version. I had just less than enough of some white Merchant and Mills linen, so I had to get creative with how to use it most efficiently. I couldn’t figure out a cutting layout to accommodate the front facing pieces, so I mulled over my other options. I finally decided on some pink cotton for the facing and a brick red cotton for the collar. I thought that the patchwork of colors plus a Liberty fabric pocket would look quirky and cute, but I quickly became concerned that this was giving bowling shirt vibes. I ripped out the red collar piece, and pieced together a new under collar in the white linen instead.
“you’re a disaster my guy” (before I ripped out the red collar)
The buttons are a gift from my friend Alexis, she found them at a flea market. I thought the stripes were pink because I was sewing in very low light 😭, but after I fell in love with them I realized they are orange! I think they look perfect.
Sizing and construction
I went down a size from what the pattern recommended; I cut a straight size 8. The ease is quite generous, and because this is a new silhouette for me, I wanted it to be a bit more close-fitting.
Instead of the recommended seam finishes, I used french seams throughout. I admit that french seams look a bit bulky at the shoulders, but this linen is an unravel-y mess and needs the frenchies. I used this fab tutorial for finishing the side seam splits and they look great.
This was the first time I used the crimp stitch. I did some googling to make sure I was doing it correctly, and I found this great tutorial from a delightful sewer. I think I’ll be using the crimp stitch instead of doing a gathering stitch to prep my set-in sleeve heads from now on.
I sewed down the facing because I hate the feeling of a flapping, floppy facing. This becomes especially annoying when the garment comes out of the wash. I topstitched the shoulder and arm seams. Lastly, I hand-sewed the facing at the shoulder as well as the collar to make sure it looked perfect.
Conclusion
I loved trying out a new type of collar construction (no collar stand!) on this garment. Sewing this collar was pretty easy.
I saw some complaints that the directions in this pattern was hard to follow. I found a few bits tricky, but I read carefully and was able to figure out each step without problems. I love it!
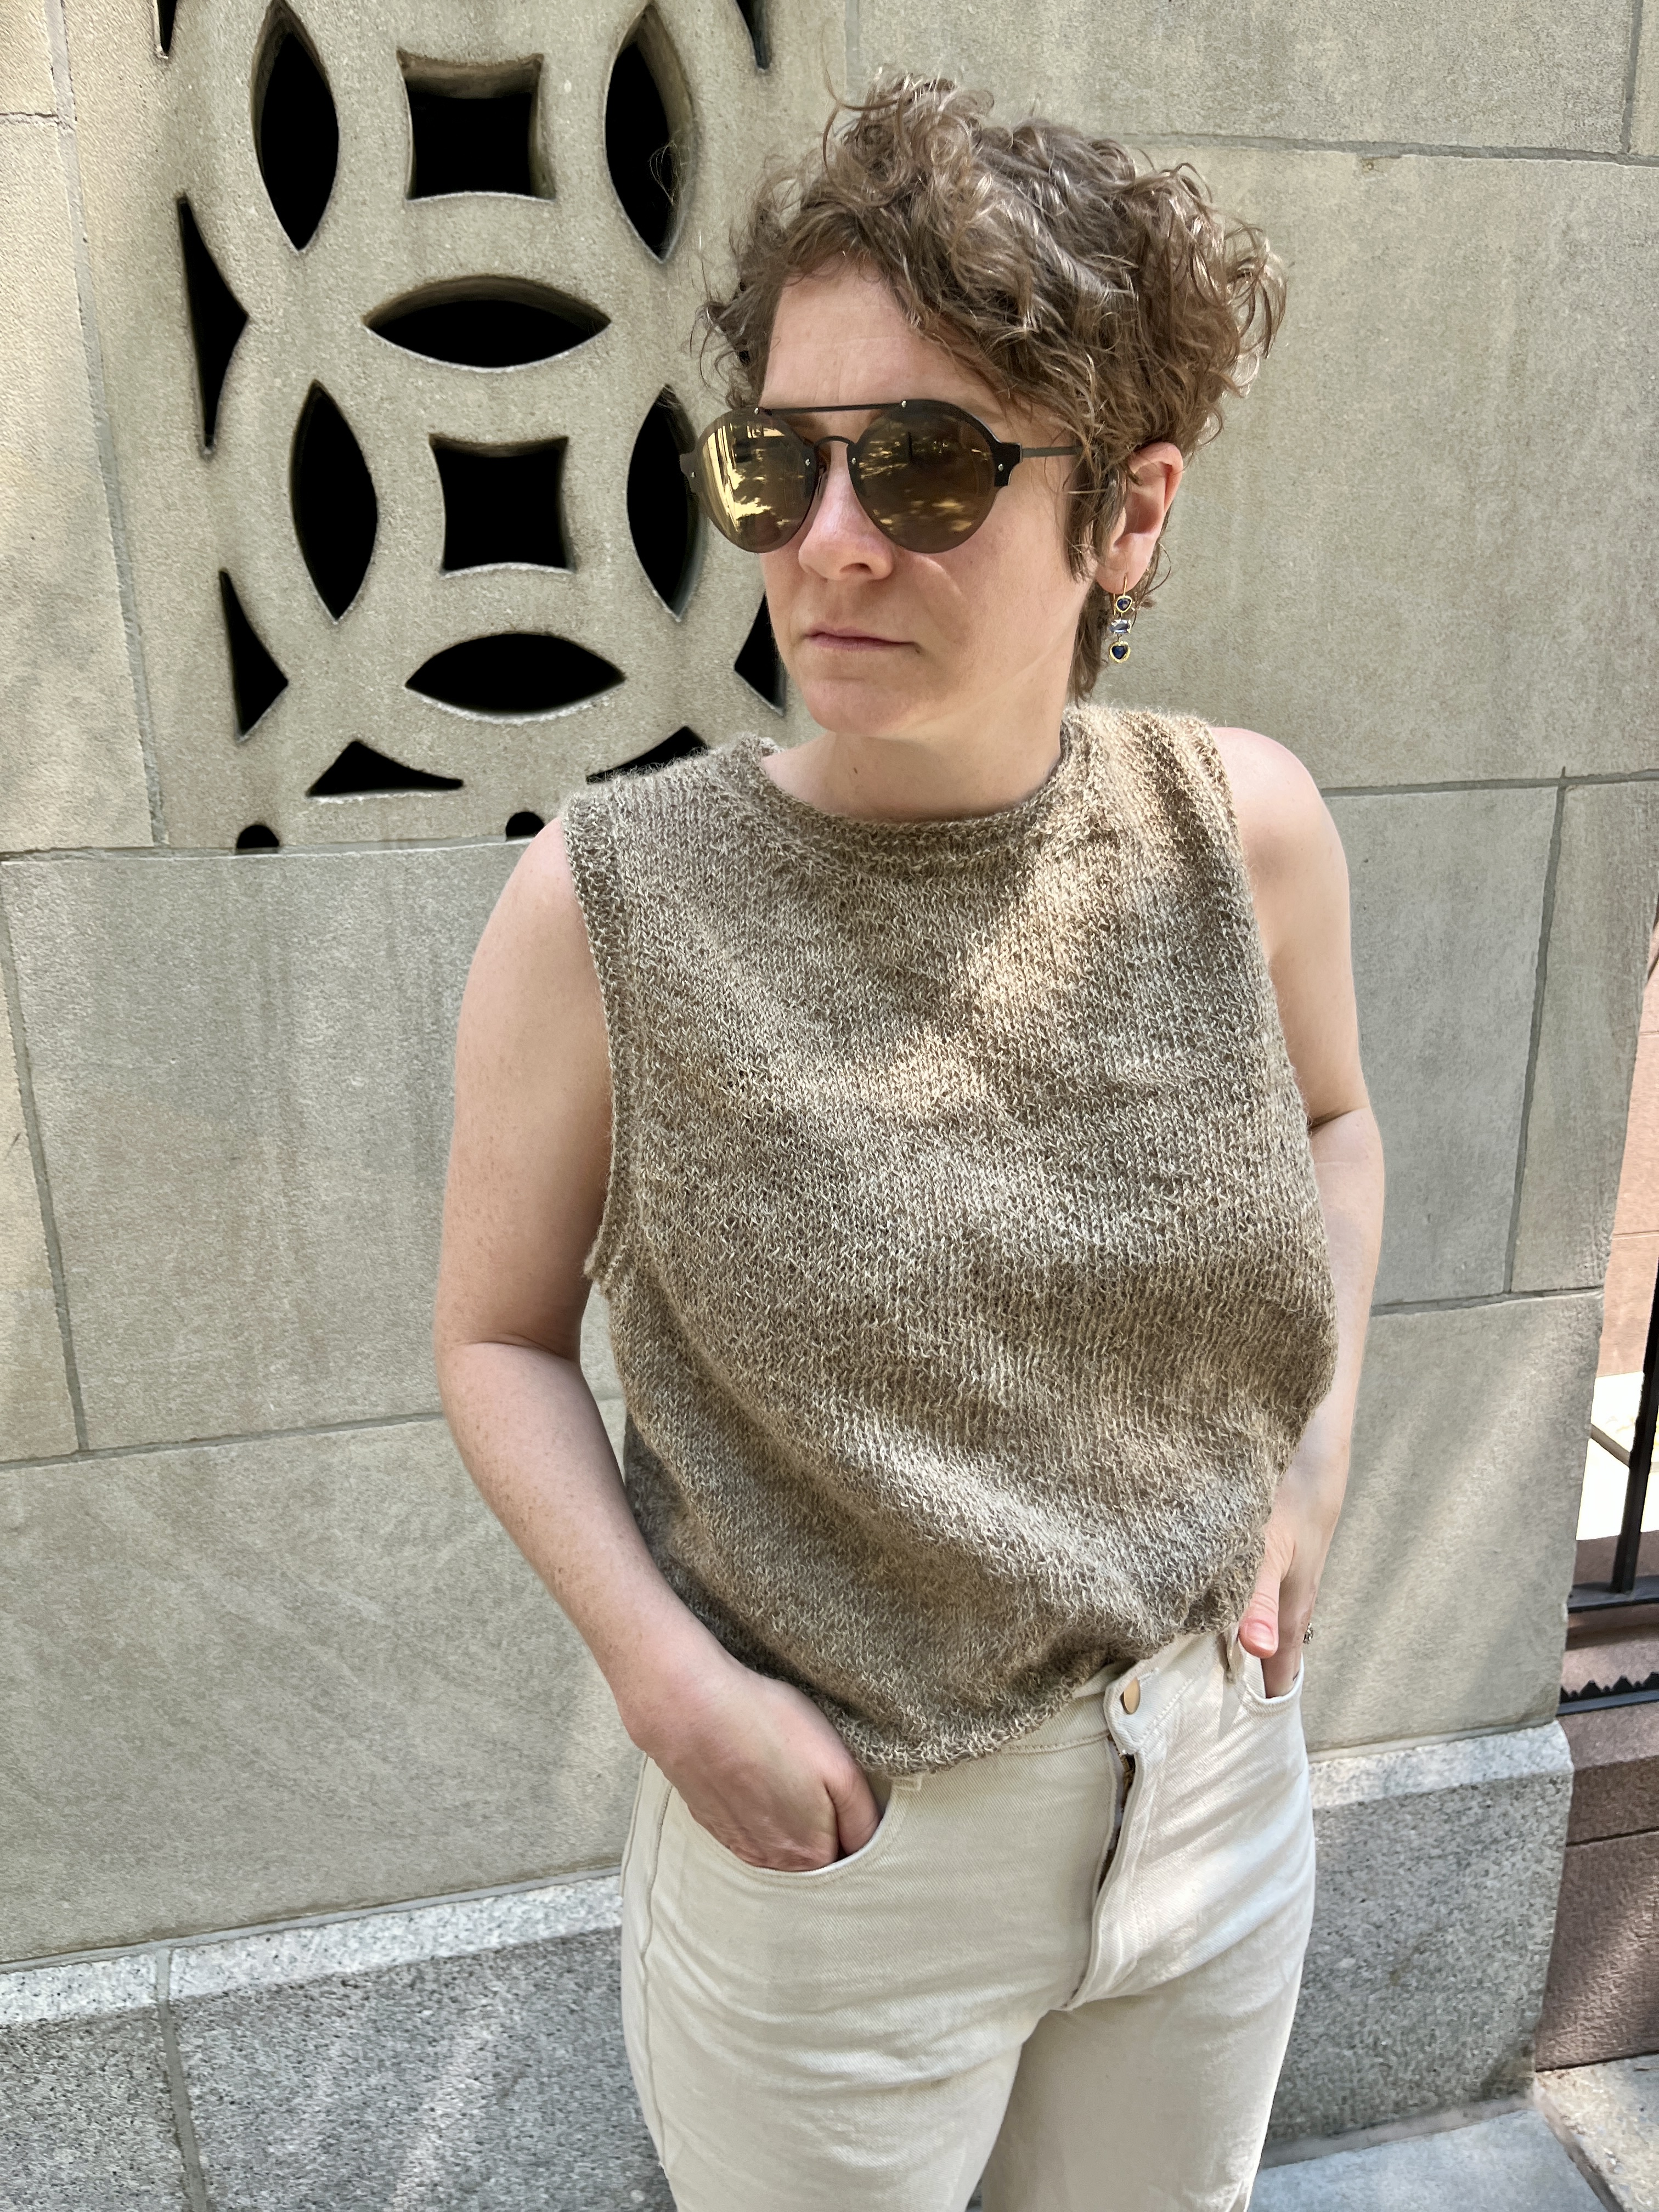
This past Rhinebeck, I was on the hunt for the sheepiest breed-specific wool I could find, and I decided on a sweater quantity of an undyed 2-ply longwool from a Cotswold sheep named Eloise (Ross Farm Fibers). Suffice to say I was alone in seeing the potential for a sweater.
As I was daydreaming about what to do with this haul, I thought about the tank top I made a couple summers ago. I have worn it quite a bit and it’s held up really well. I bet you know what happened next: I decided this Extremely Wooly Wool was to become a summer tank top. Rigby by Julie Hoover was already in my queue so I decided it was time.
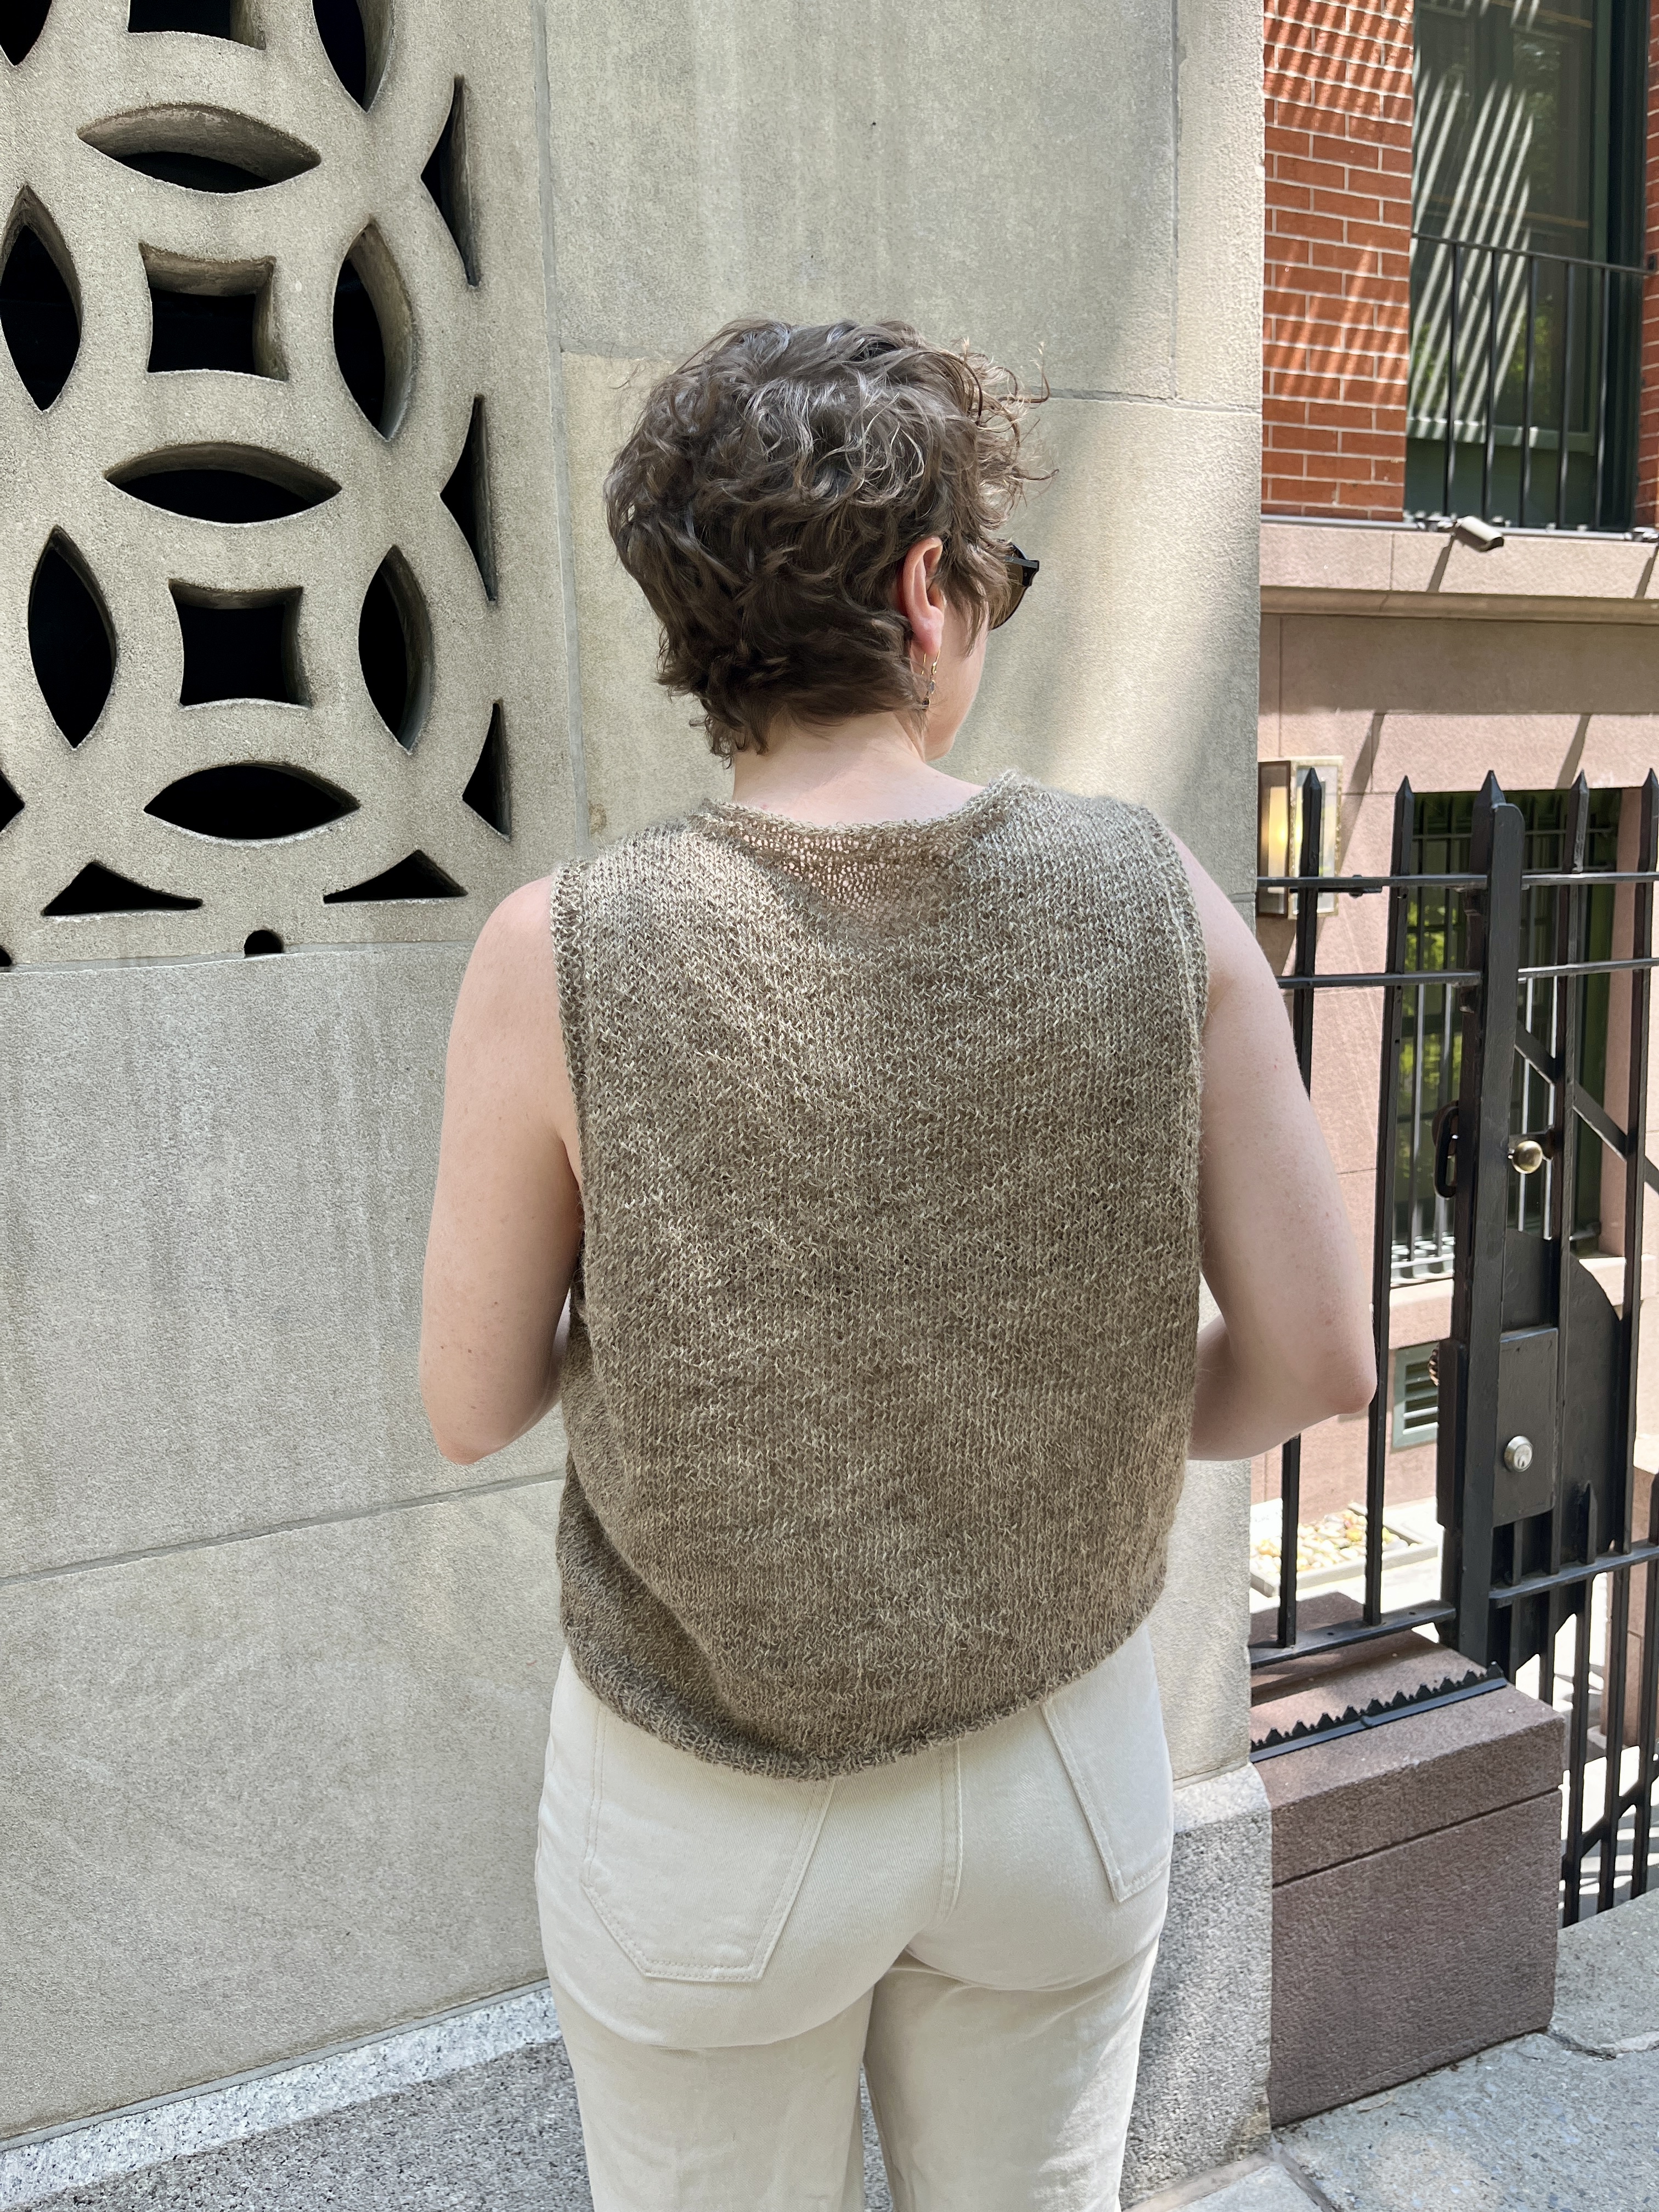
I started knitting and quickly became concerned that this was not going to be wearable in summer. Despite this, I persevered and sprinted through the finish line at the beginning of Memorial day weekend. I’ve put it on a few times and it’s actually quite nice. This weekend’s weather was one for the books, so I bet that helped a tiny bit. We shall see how the dead of summer goes. I love the low armhole, which I achieved through careful swatching getting lucky with bigger needles. If I make this again, which is a very real possibility, I will knit the front and back completely flat to give some structure to the sides.
…and I think I’ll use something a bit more structured… and… soft. Maybe!
I have been on a blouse kick lately. Its nice to throw on a structured top with jeans and feel put together. Enter the Regalia blouse from Sew House Seven. I thought it looked fun so I pulled the trigger and sewed one up.
a rumpled front view
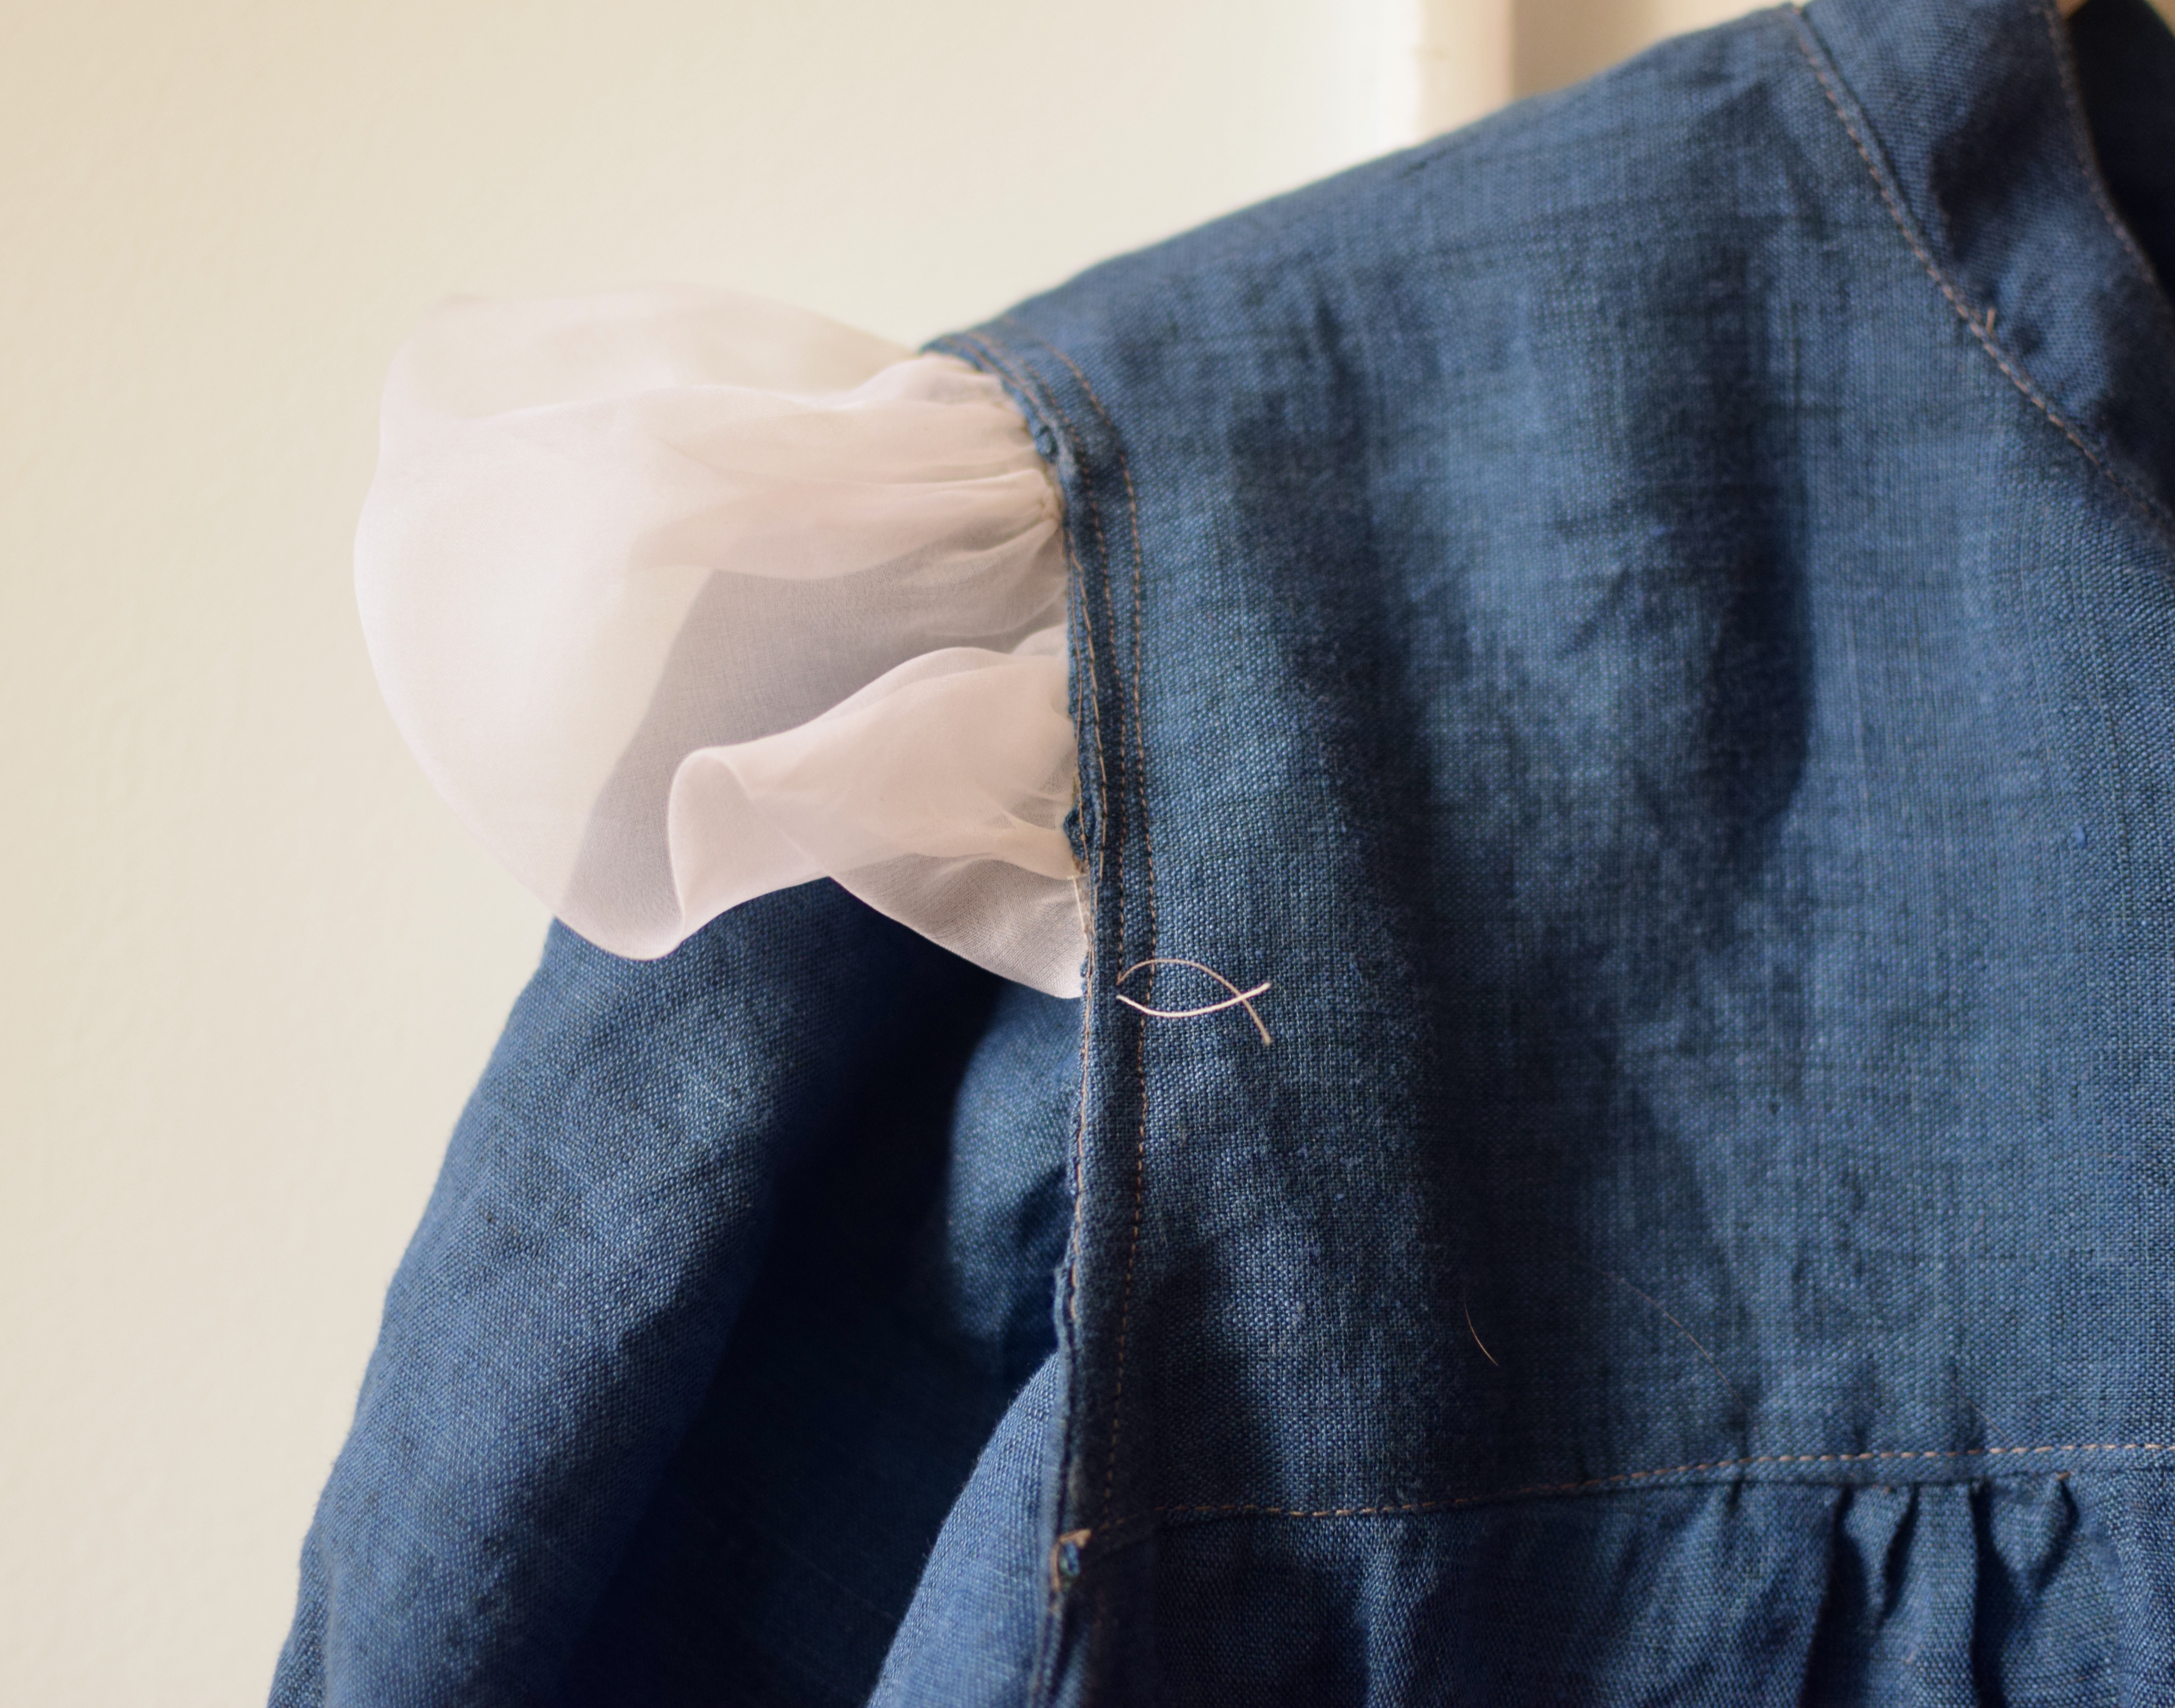
I used some blue linen leftovers paired with taupe thread. It was very straightforward to sew, and it fits nicely. I opted IN to the sleeve head pouf, and I like it. I did not have tulle so I used silk organza. It is a decidedly slight puff, but it feels dramatic to wear. The self-fabric yoke and french seams contribute to its sense of quality and craftsmanship, its a delight to wear.
the back fastens with a bow. this looks a little bit chunky to me, if i make this again I think I’ll do a button closure.
VKL was back in NYC this year, and even though I hate going through Times Square, I went to check it out. It was much quieter this year than in 2020 (I typed 2019 at first, but it was in fact one of the last large crowd activities I participated in before the Pando descended).
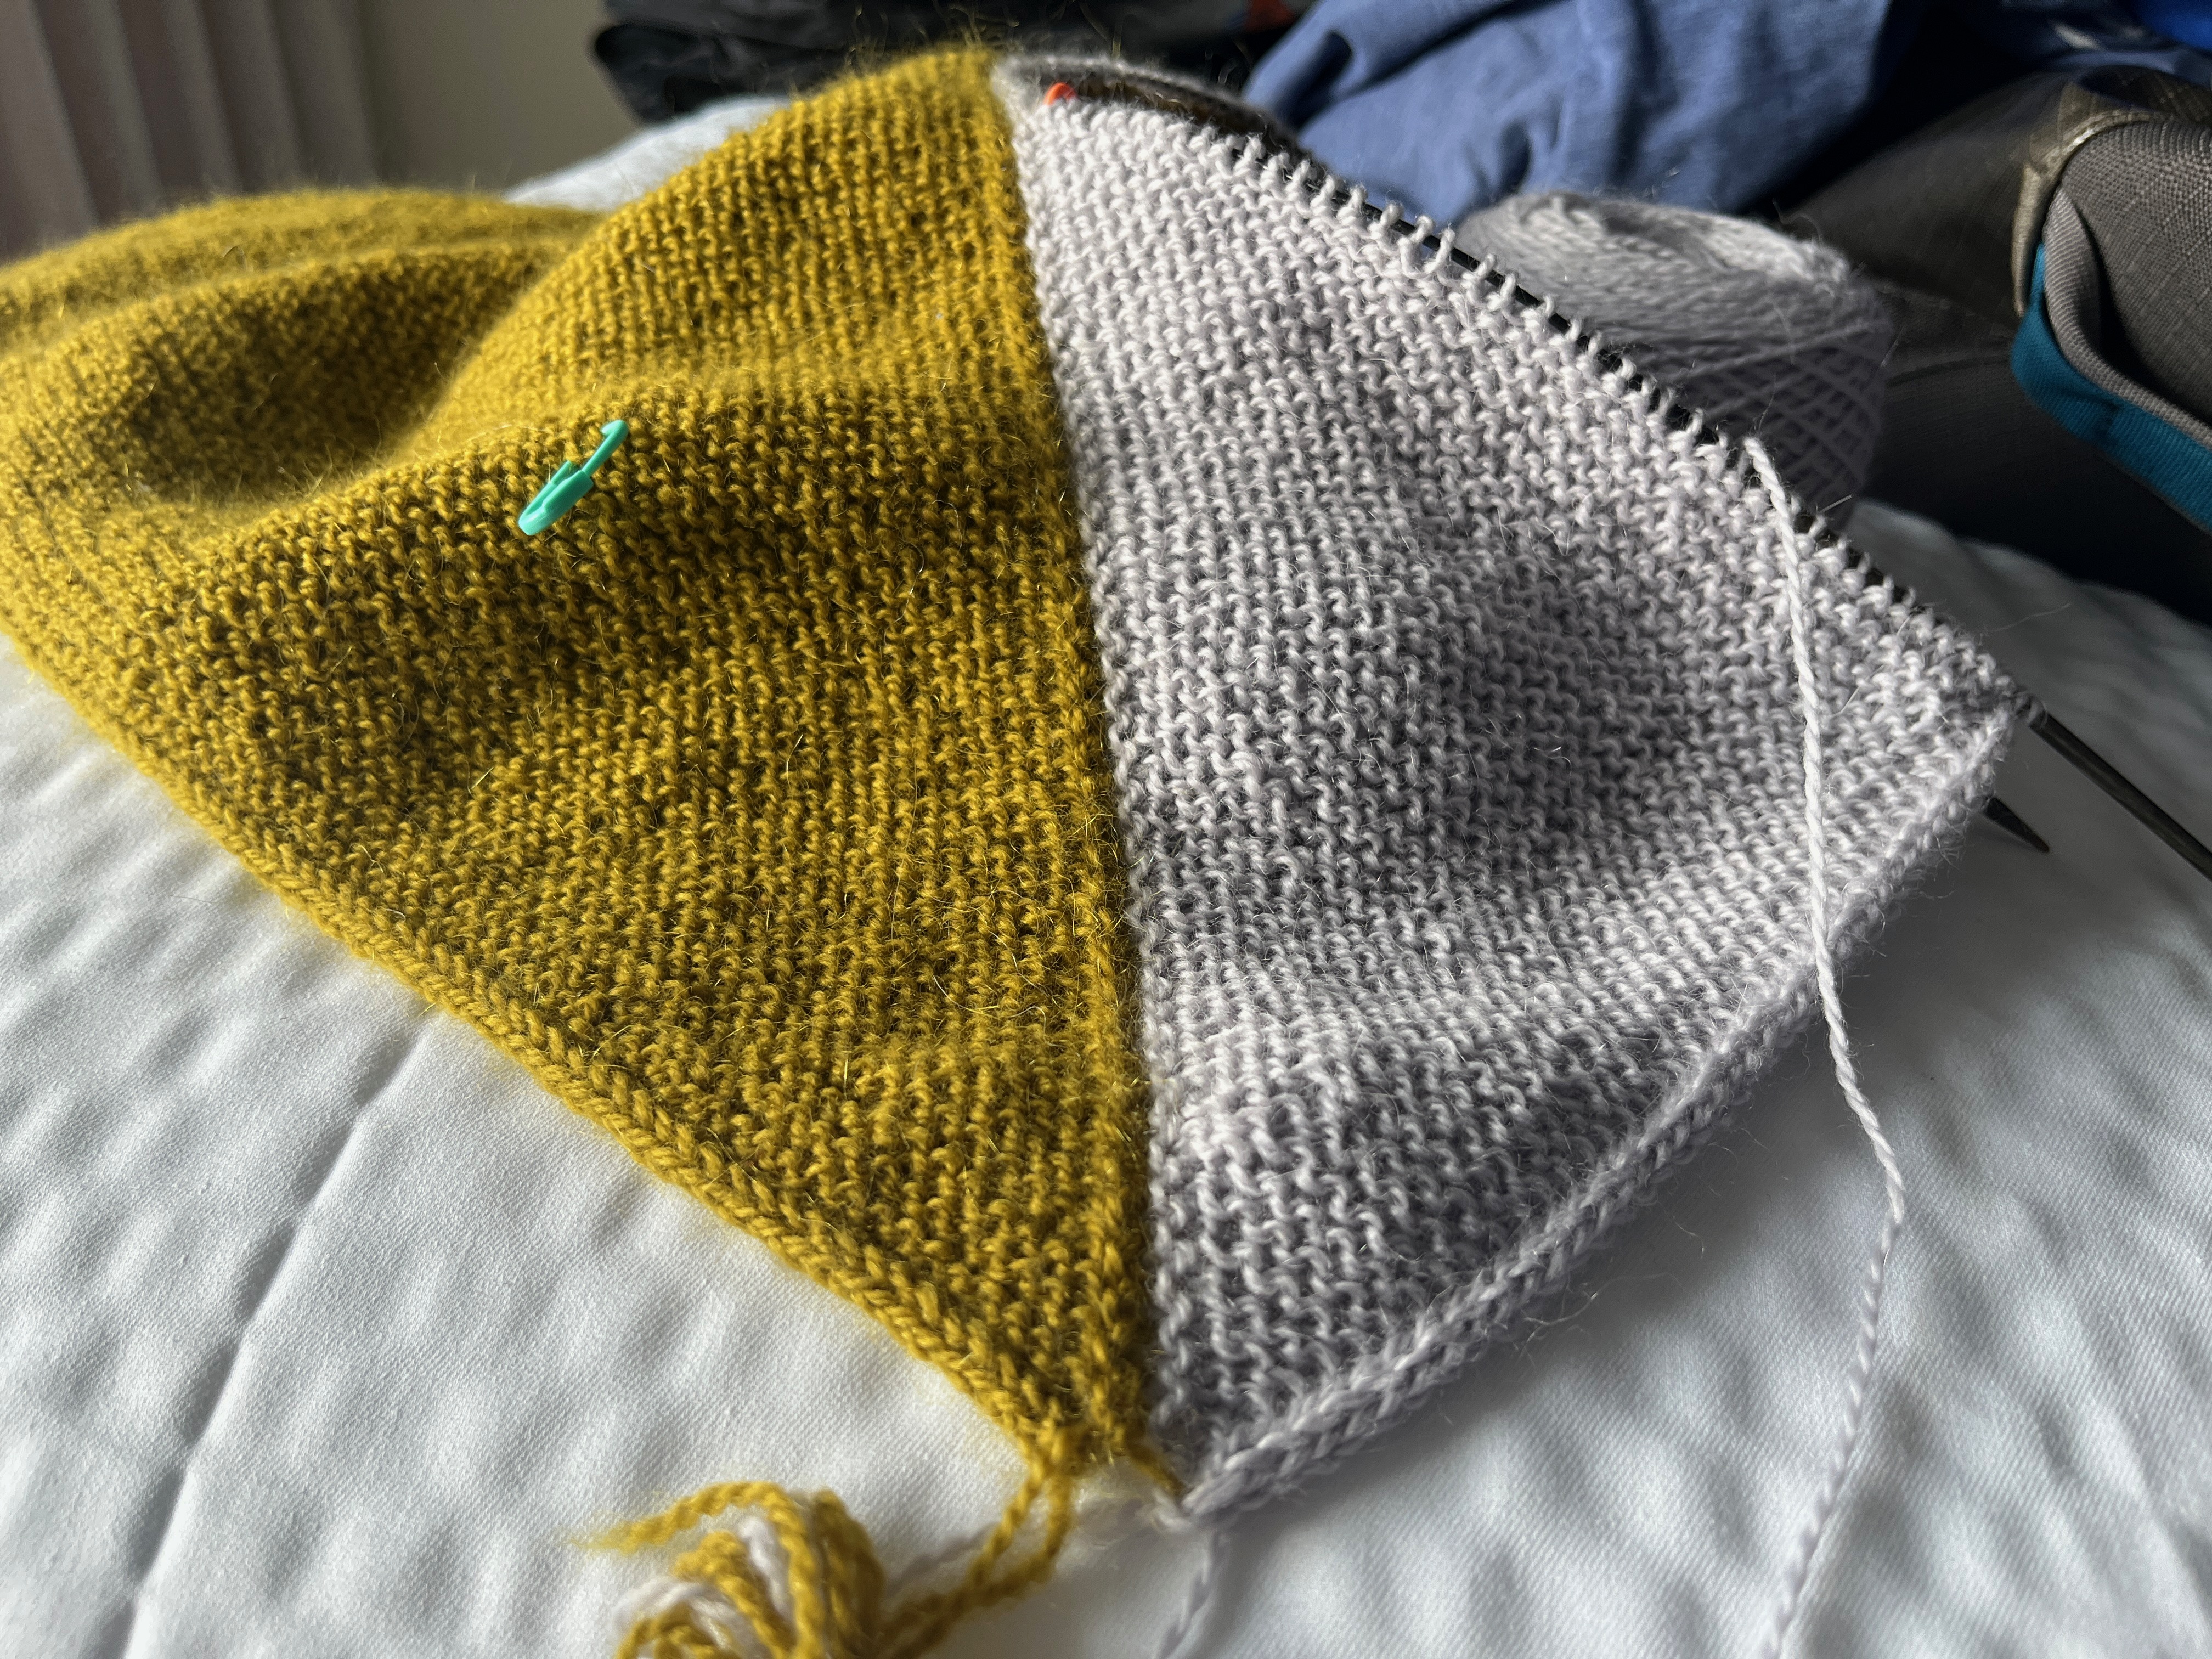
I contemplated my Ravelry queue ahead of time, and was looking for yarn to make a “Half and Half Triangle wrap” because its been in my queue forever. This winter, I noticed that I often reached for my Aestlight shawl I made back in 2012. Made of the Hottest Yarn at the time, Malabrigio, its full of mistakes because I barely knew how to knit. I wanted something to replace it. Triangle wrap sounded like a good fit.
After doing a lap through the show among the other early birds, I realized it felt a little weird to be able to duck into a booth without fighting crowds. I decided go back to Kelborne Woolens to get some Andorra for my project.
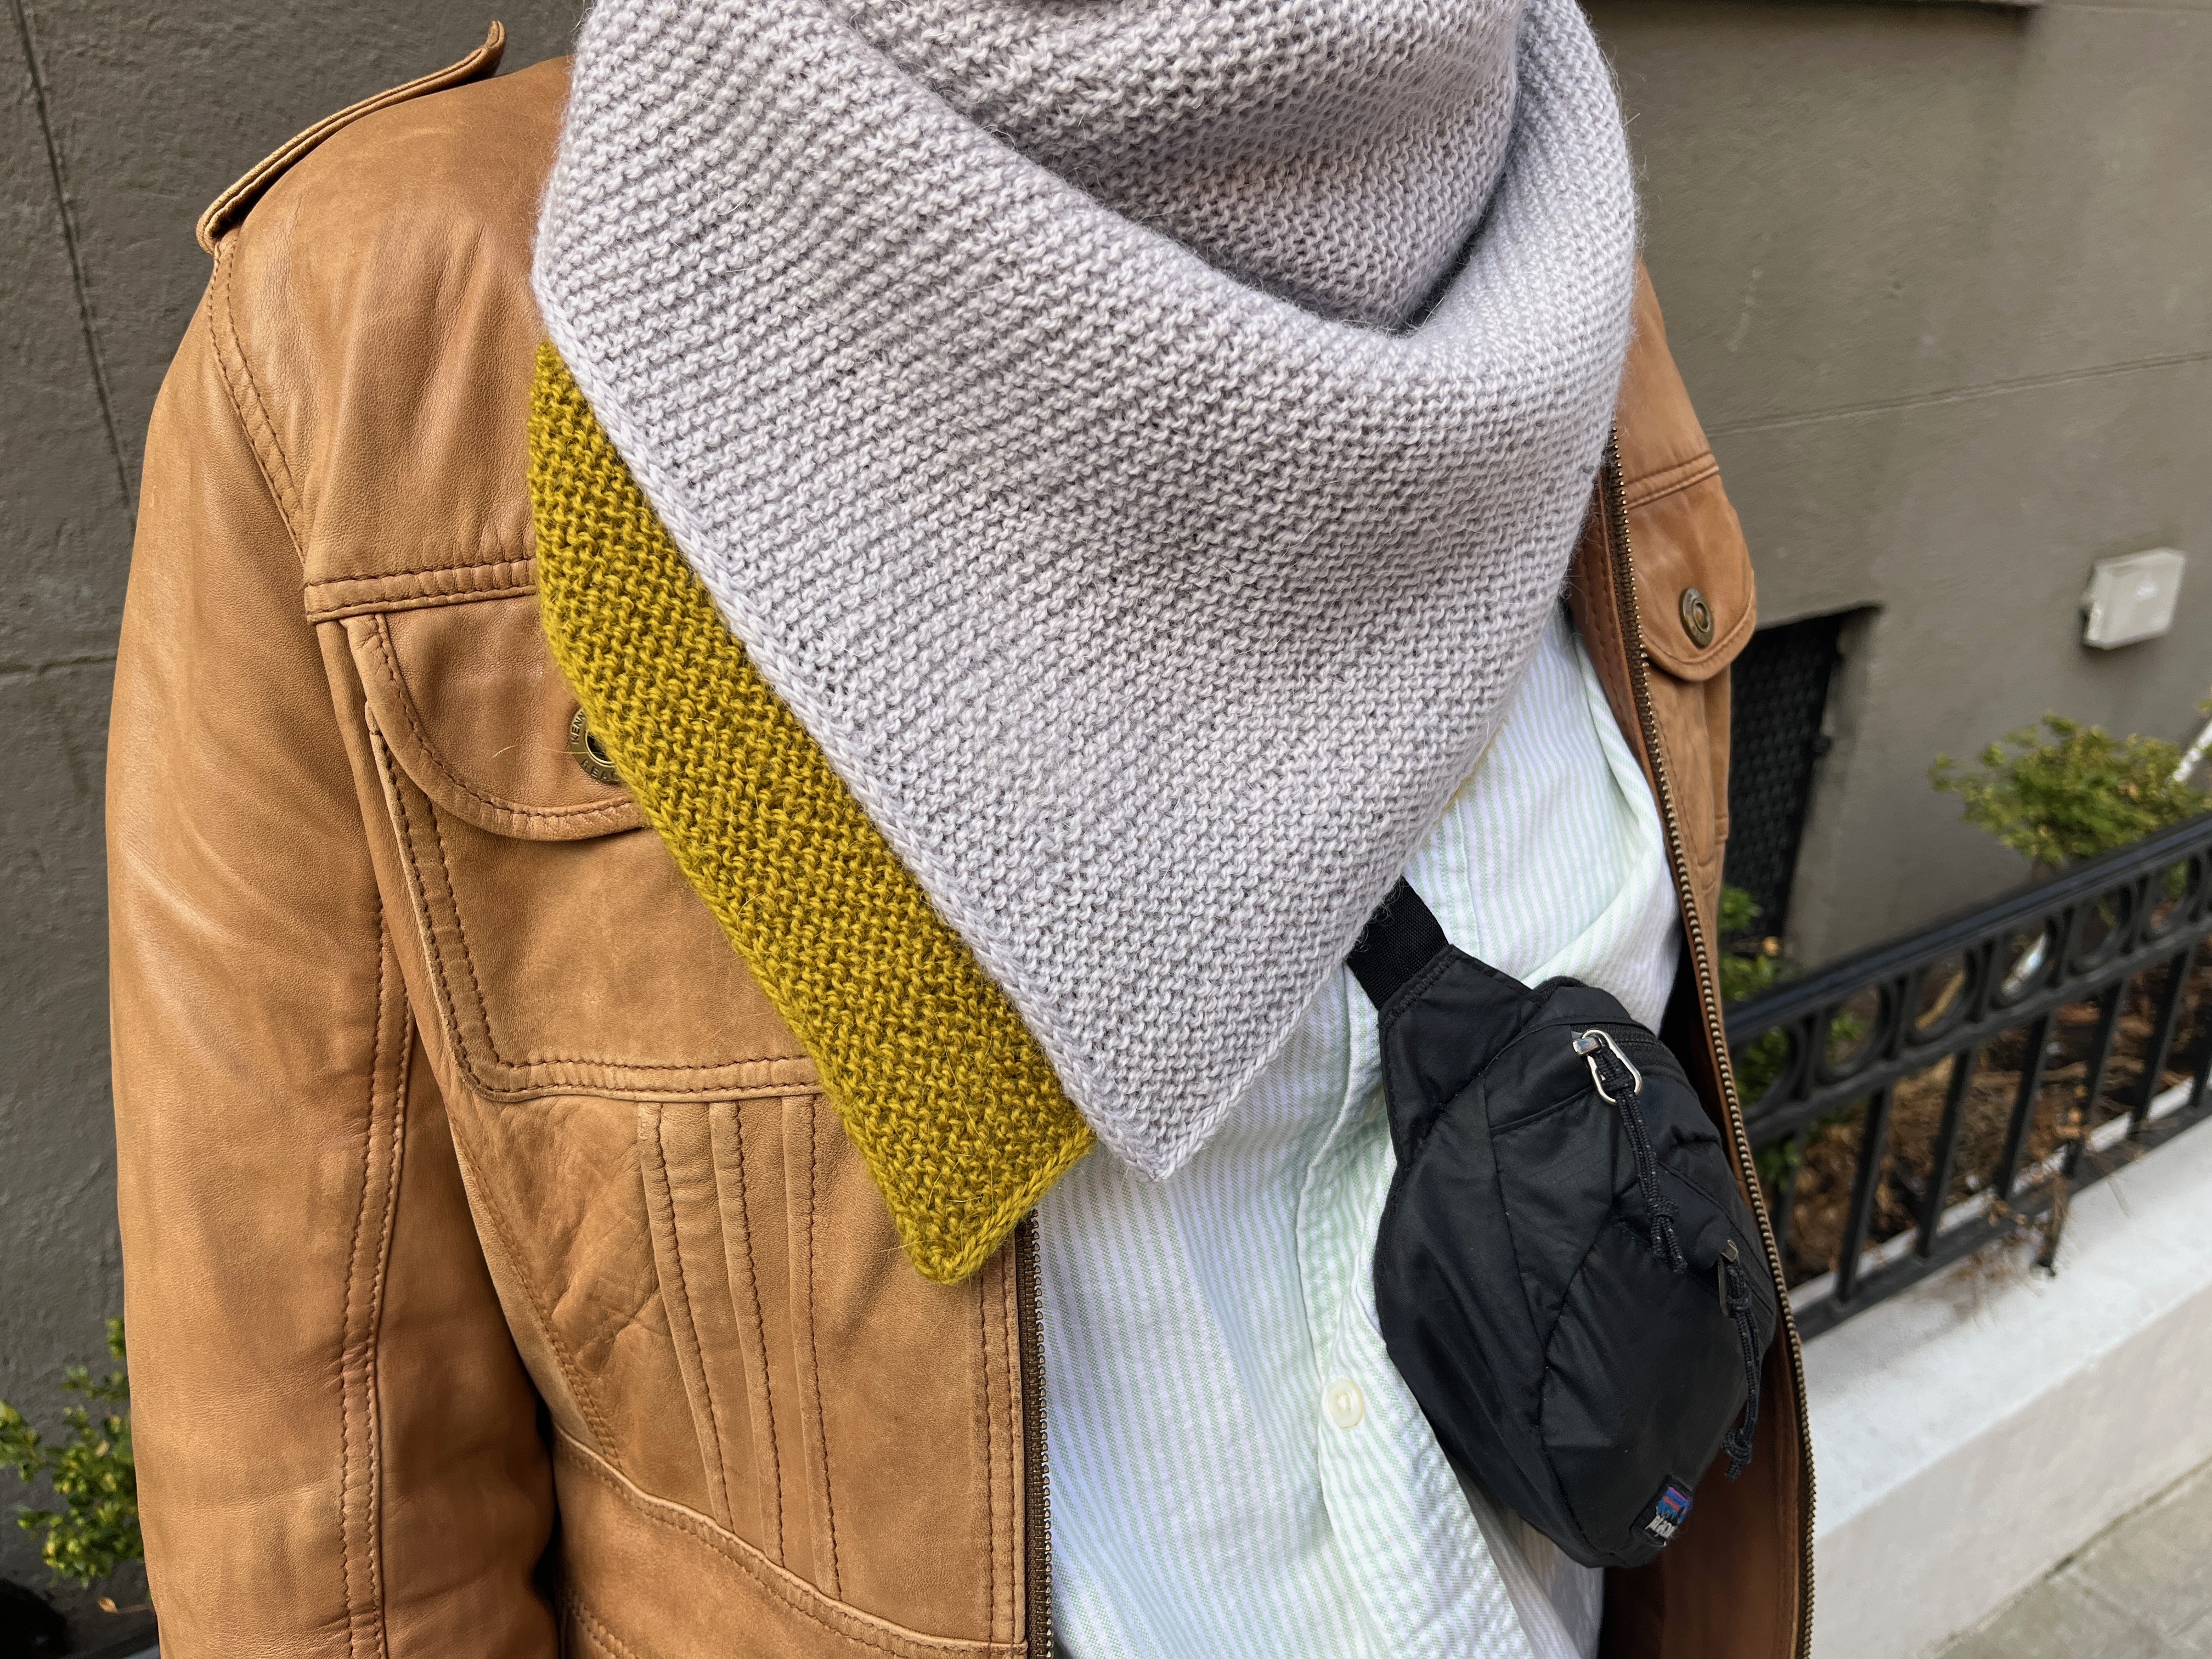
When I got home, I started the project immediately–– WIPs be damned. I knit this in a little more than a month during my subway commute and over 2 plane-trips. I am pleased with the icord edging I finagled around the scarf’s perimeter, as well as the squish of overall garter stitch. Nothing super exciting, but bright colors to liven up the last of winter and early spring!
This is Kelbourne Woolens’ Andorra in Dijon, a mustard-y green and Cloud Gray, a very pale lavender.
Progress photos
I snapped some photos along the journey. It was nice to have such a simple, yet engaging pattern to lose myself in.
Top-down seamless sweaters are wildly popular, in part because they require very little seaming. Perhaps because I am a sewer, I do not mind seaming, so this advantage is lost on me. In my opinion, the structure seams add to a knitted garment is well worth the effort. Additionally, a seamless sweater gets SO heavy and bulky to transport, and it really slowed down my momentum that I needed to finish. My last gripe with this project was the collar. I thought I was clever with my foldover collar modification, but it looked very bad. I think my yarn did not help the situation, it is a 85/15 cotton/alpaca blend. Luckily my surgery went very well and I was able to salvage it.
Enough of my complaining, I am glad this sweater is finished and Jacob is enjoying wearing it.
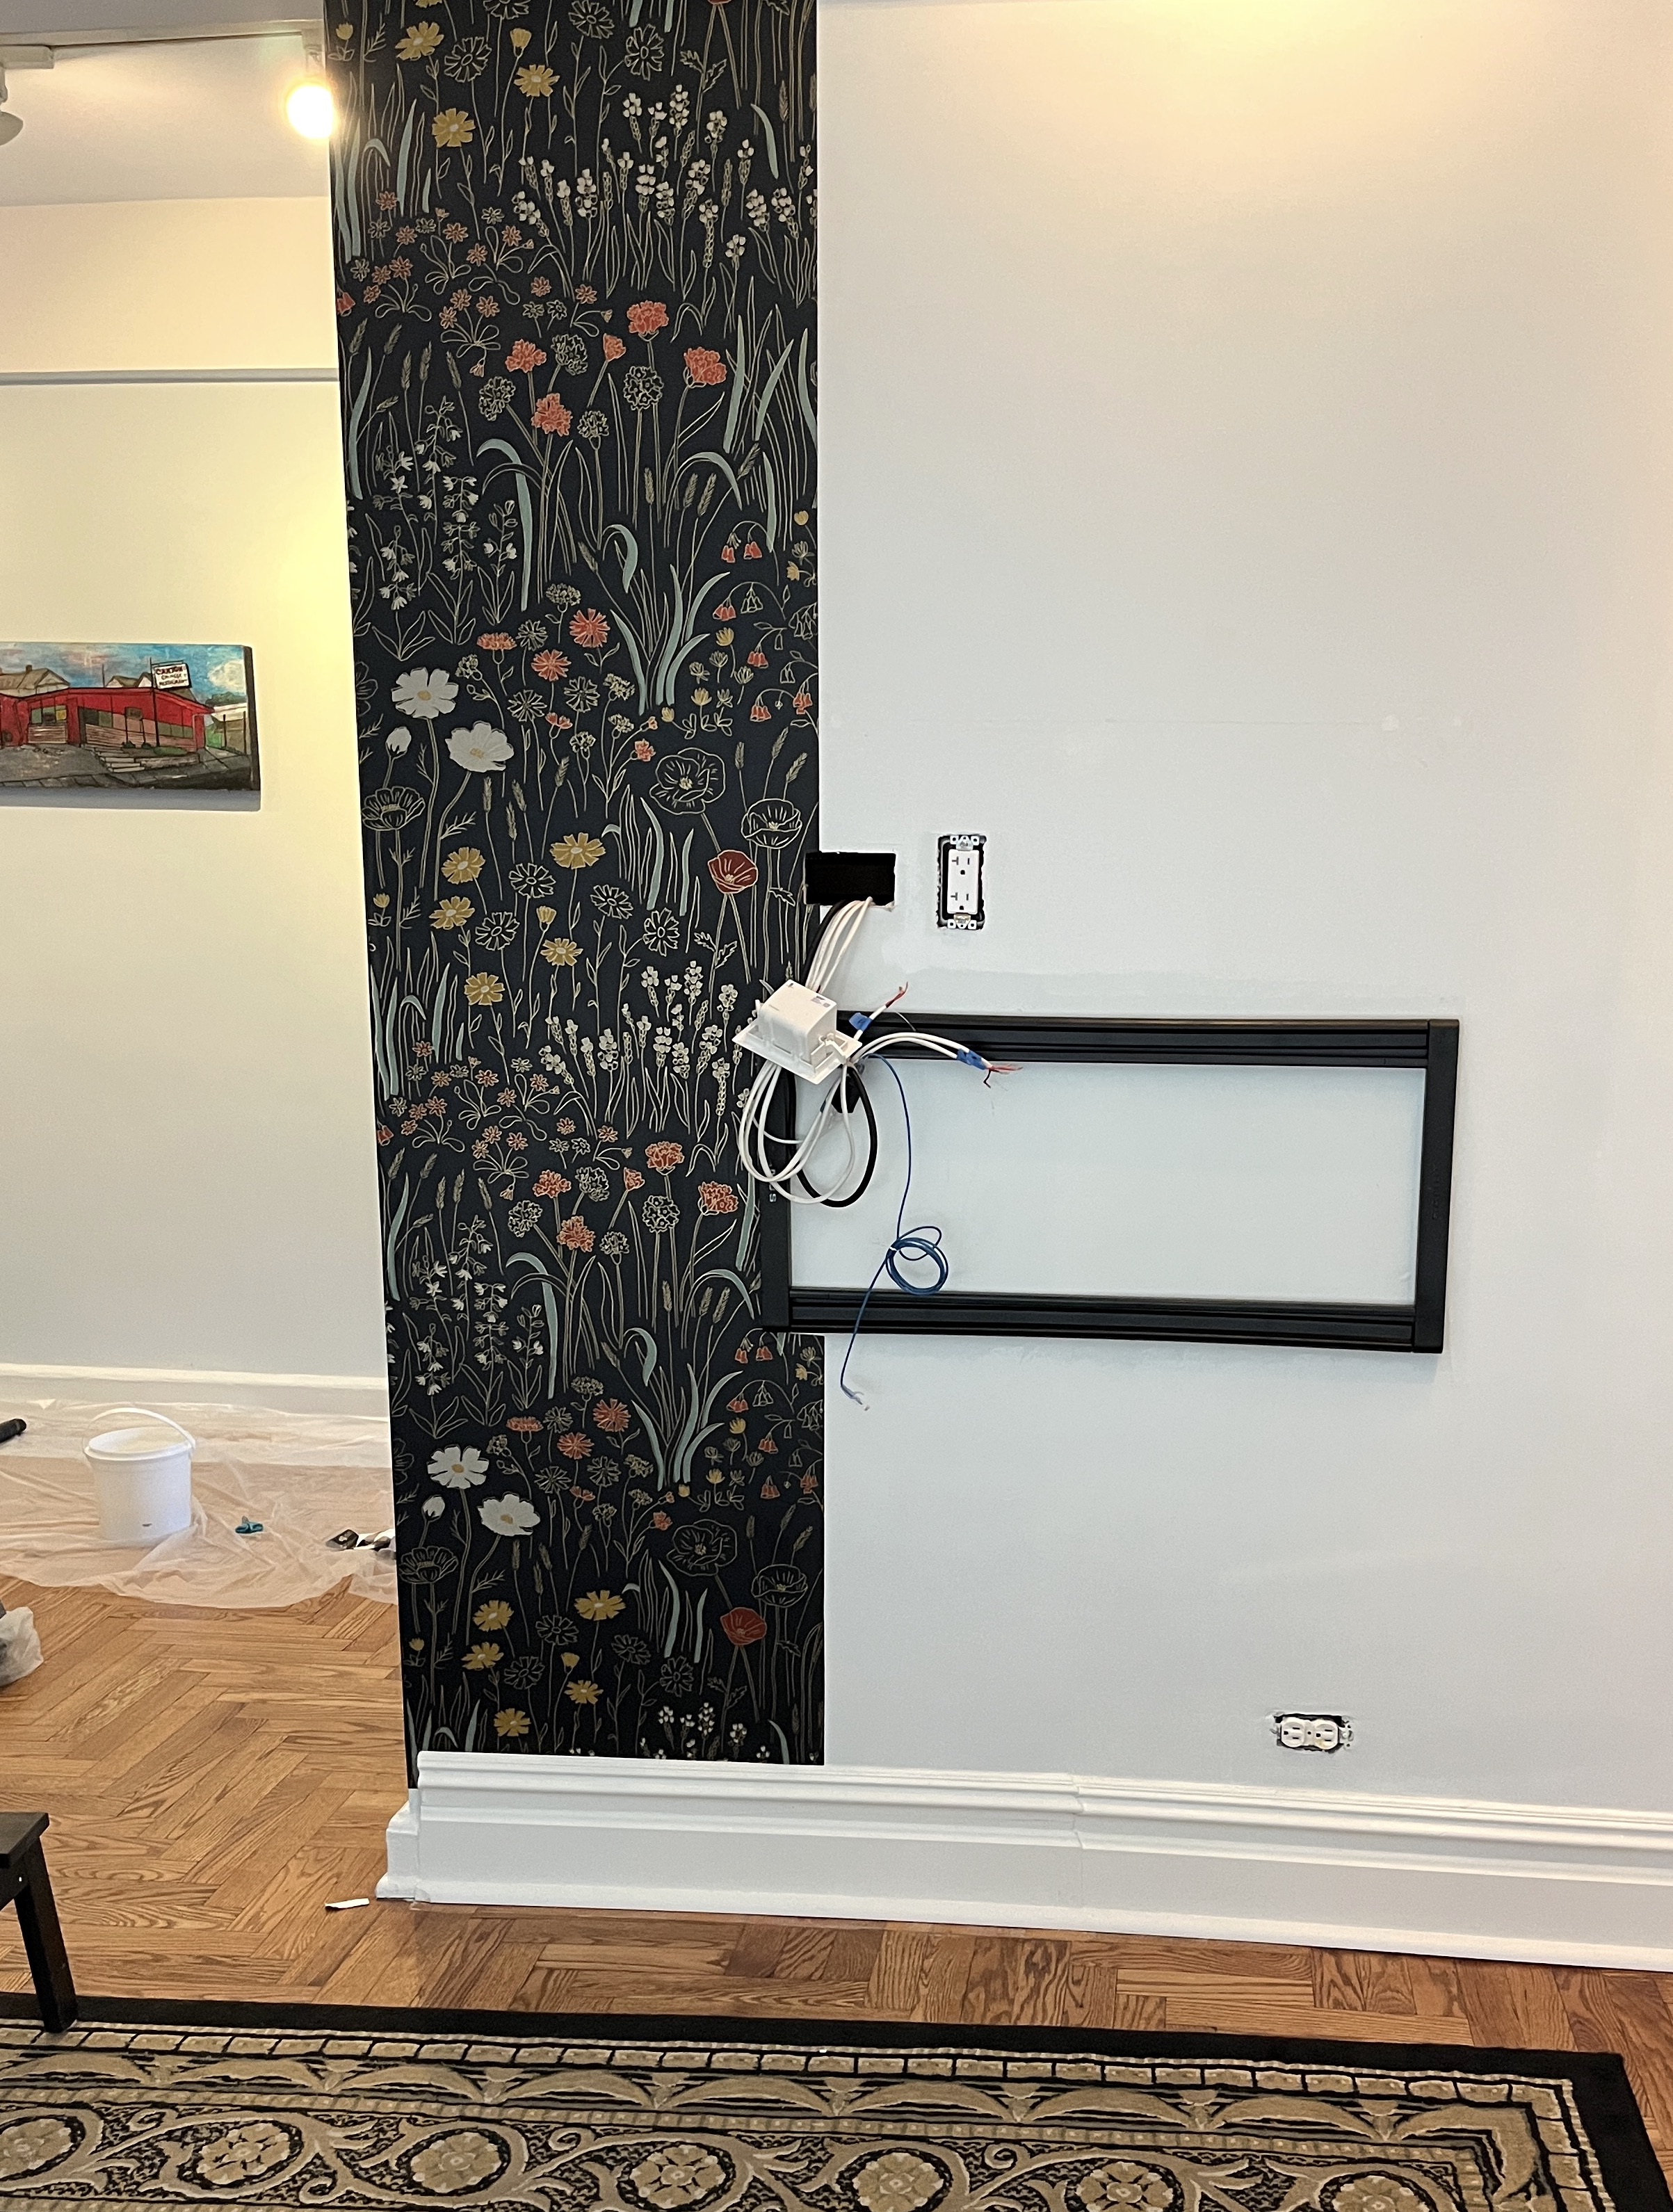
We have lived in our apartment for 2 years, and I was pining to put up wallpaper since moving in. After browsing wallpaper for months, I found the perfect print: colorful gold-ink-outlined wildflowers on a black ground. When it arrived, I was too scared to install it: I was afraid of how hard it would be to install, and I didn’t want to regret the placement. I talked to some friends who have wallpapered before and heard mixed recommendations about whether or not to put it up myself. Over a year later, I finally did it.
I contemplated hanging the paper in different parts of our apartment, and I finally settled on behind the tv, wrapping around to the hallway because it has so few “obstacles” to overcome and you can see it from multiple vantage points. I love it.
Supplies
I took the recommendations of Hygge and West to heart and got their recommended wallpaper paste and supplies. Even though I read over and over that you need to change the knife blade frequently I still didn’t change it enough and it ripped the paper. I went back in with some matte black tempra paint to cover up the rip marks.
How I put it up
The wallpaper I used is “half drop” which means the pattern repeat does not match at the same point, it matches halfway down the repeat. I cant imagine how challenging it is to design the patterns this way!!! I created a Figma mockup to get a sense of how much wallpaper I needed. Each rectangle is one repeat.
The thing I found most surprising about putting up wallpaper is how much you can “MANHANDLE” it. There is a 10 minute period while you’re putting it up that you can pull it back off the wall rather aggressively to reset it. I put this up in 3 2-hour sessions and I was covered in paste by the time I was finished with each session. The paste is a very off-putting consistency and it is extremely sticky (not surprising!).
the wallpaper paste mid-spread. i slapped some on with the putty knife and spread it around with the paint roller.
after you paste up the back of the paper, you bookend and let it sit for 5 minutes to soak in before proceeding to put it up. This is a pretty bad bookend, it should not have those wrinkles, but this was my first piece.
behind-the-tv situation.
Resources
In addition to following Hygge and West’s instructions, I watched many youtube videos before diving in to this project. Here are some videos I found particularly helpful to watch.
I found this man’s technique very helpful for wrapping the paper around the external corners. I did NOT use heat as he insists, but I emulated his smoothing tool technique and embraced his advice to use a narrow overlap to the new edge. I had one corner that had a large overlap and it was very challenging to complete the turn. I am not sure what you are supposed to do when you face these situations because you want as few seams as possible. So I just dealt with the scenarios as I came to them.
I had one visible outlet to deal with (there were more behind the TV but you can’t see them!), and I decided I wanted to pattern match it. This video was really helpful to watch. Instead of spray adhesive, I used paste.
Overall, a very successful and satisfying home project!
I finished a new coat and I’m pretty pleased with how it turned out.
me, pleased with how this coat turned out.
Choosing a quilted jacket pattern
I have been scheming to turn some stashed Pendleton into a quilted jacket for quite awhile, but was pretty nervous to cut into it. I was torn about what pattern to choose and almost went with Hovea from Megan Nielsen, but I didn’t quite like the neckline options. My biggest hesitation of the Tamarak from Grainline Studio was the lack of a collar.
Last year though, Grainline released an expansion pack that includes a collar, and even though I probably could have figured it out on my own, I bought it for the instructions (they are great!).
Materials
I’ve had this Pendelton wool in my stash since 2019. I fell in love with it at the Pendleton Factory Store in Portland (Oregon!). I also had some red silk charmeuse discards from a friend-of-a-friend, a talented seamstress in NYC. I was really inspired by this Tamarak, and planned on copying their idea to bind the seams with the charmeuse. It turned out too be incredibly fiddly, and I didn’t have enough of the charmeuse for bias binding anyway, so I went with pre-made black bias tape. I think it looks good!
The snaps were installed by Star Snaps. I do not have any snap tools, and decided to lean on the professionals since they are so closeby.
Before I started cutting, I watched the entire YouTube sewalong which was very helpful. I especially liked all of the quilting tips!
I lengthened the jacket by 2″ and I wanted to adjust the pocket placement to be on an angle, but I ended up sticking with the pattern’s placement because I was nervous that I’d get the welts wrong.
This fabric was challenging to sew with my machine. Because the charmeuse is so slippery and the wool is so toothy, it was a nightmare to keep them aligned while I quilted (YES I used a walking foot). The back piece was so big and the lining shifted so much that I had to patch it in parts. Just before I quilted the last pattern piece, my extremely talented friend suggested that I cut the lining bigger than the pattern piece to add some wiggle room in case of slipping. This proved to be a very great idea, please take this advice if you are making one for yourself!
Putting these struggles aside, this jacket rules. I lined it with wool batting from Purl Soho. I was a bit concerned with how to tackle the binding, because with something this thick I was really worried about sewing the second side of the binding and making it look professional. The solution was to hand sew all of the binding. The fronts and collar took an extremely long time to hand sew, but the result was absolutely worth it.
The Turia Dungarees pattern was released 10 years ago, and this summer I decided make my first two pairs. How did it take me so long to realize how great overall shorts are in summer?
me realizing how great overall shorts are in summer
Because this pattern has been out for so long, many people have made them and have some great suggestions on how to go further to make these even better. I finished the raw edges w regular width bias tape and extended the pockets to tuck into the waist seam and side seams.I can remember when I first started sewing bias tape was so hard for me to get right. This time, I used the regular-width bias tape and I didn’t mess it up at all!
tush shot
For this pair, I used leftover canvas from making my Field bag. I made my first pair from some Sally Fox twill, and immediately afterwards I saw the canvas sticking out of my fabric pile and thought, why not! The canvas is very stiff, so I was very nervous these would be extremely uncomfortable. They are very comfy, believe it or not.
I didn’t have enough fabric to cut 4x straps, so I cut 2 and turned the edges under. I wish I would have used bias tape to finish the raw edges, but by the time I realized this it was way too late. The contrast chest pocket (some leftover hand-woven cloth from Verb) was another consequence of too little fabric, but I love how it turned out.
Star snaps did an excellent job with the rivets, they did a better job than I could have. Great pattern! If you haven’t tried overall shorts, I highly recommend them.