Archer For a Friend.

archer_sleeveless_front_2

archer_sleeveless_front_1

I made a sleeveless Archer a few years ago using Grainline’s awesome tutorial, and I wear it all the time, even though its a white-with-bright-stripes 90s-looking seersucker. My friend Chrissy saw me wearing it one day and commented on how much she loved it, so I decided to make her one for her birthday.

I had some leftover all-white seersucker, but it was barely enough to cut out the shirt. I had to get a little creative with the pattern piece placement: I cut the button band and pockets the wrong way. I didn’t even have enough left to cut the inside yoke, so I used some light micro-floral cotton. I also used it on the under-collar as a subtle way to introduce some color to an otherwise stark white shirt. It took me a long time to settle on a fabric that wouldn’t show through the seersucker too much. I really struggled with buttons, I spent forever comparing at the fabric store before settling on these taupey gray ones. This is the first time I used a teeny button for the collar stand, and I like how it turned out. I also recently got a buttonhole cutter and some fray check, and WOW they improve the finish to look much more professional!

archer_sleeveless_undercollar

archer_sleeveless_close_1

I am so happy with this shirt, especially because I look at it and see such great strides in craftsmanship since the last time I made one.

archer_sleeveless_close_2

Summer of Basics #2 and #3.

DSC_4114

Continuing on with my second item for #SummerofBasics, I made a self-drafted linen gauze tank, heavily inspired by Karen Templer’s version. I made a patch pocket pattern piece and fully intended to use it, but I forgot to sew them on before joining the front + back, and decided to wait until the top came together to see if it felt right to add them. I think the side slits are too “extreme” to logically accommodate pockets, so I left them off.

I traced a woven tank top I liked to create this pattern. I made a quick muslin to make sure I traced accurately, and then I cut into the little bit of linen gauze I had left from my Tessuti visit last year. This material is pretty sheer, but when its 90 degrees outside with almost 100% humidity, such concerns retreat away through the heavy haze of summer.

DSC_4121

DSC_4106

I cut the back along the selvedge in two pieces so I could remember how pretty it is, with its chambray-esque blue and a stripe of green. I used white single-fold bias tape for the neckline and armholes, and french seamed the shoulder and side seams. I made a mistake and double-folded the side slits to the right side (instead of the wrong side) of the garment, but I actually like it as a design feature, so I left it as-is.

moss_skirt_piping

For my #SummerofBasics Number Three, I made a Moss skirt from more of that leftover Essex linen I had in my stash. I thought red would be an unusual color for a skirt, but it turns out that I love it and it doesn’t look unusual at all! I am not sure the essex linen is the best fabric for garments, as it unravels very quickly, but I bound all the seams with bias tape, so hopefully that helps with the skirt’s longevity. I had some berry colored piping and added it to the pockets and I think it adds SO much to the look of the skirt. I used the teeny bit of striped Italian shirting I had left for the waistband and pockets, and I LOVE it so much. Overall, really happy with how this turned out. I do notice that when I wear it, I have to constantly pull at it to make it sit correctly on my hips. I think I made the right size, but I am not sure why this is happening. I might get some true bottom-weight fabric and give it another shot.

moss_skirt_inside_boundseams_2

moss_skirt_inside_boundseams

moss_skirt_pocket_1

An Eyelet Ruby Dress

ruby_dress_front

I made my 3rd Ruby dress from Tessuti. I LOVE this pattern so much. It is so fast to make and is easy to wear. I had been dreaming this up for a few months, but just didn’t have time to make it until now.

ruby_dress_back3

I bought the eyelet from Mood fabrics last year, and when I was checking out, the eyelet bolt happened to lay on top of someone else’s bright mauve (what? just trust me it was a bright mauve) fabric and I loved the pop of color, but regrettably I did not buy it. The idea of eyelet with a bright pop color underneath stuck with me, though.

I ended up using some almost-neon-yellow super soft voile from Firecracker Fabrics and used that to underline this dress. I took a lot of inspiration from the Ruby hack that Tessuti posted awhile ago, especially the back, but instead of binding the armholes, I made a front and back facing using this tutorial. I liked the look of the binding so I kept it for the neckline. I bound the seams (except the center back..) with bias tape, which really helped to neaten the inside of the garment. I had aspirations of hiding the back bodice within the facing, but it would have stuck out of the dress, so I hand-stitched the bodice lining to the center back instead. I had the crochet-covered button in my stash and I think it fits the look of the dress perfectly.

ruby_dress_insideruby_dress_backruby_dress_pocketruby_dress_outtake

A Whimsical Collared Shirt

Although I thought I was sick of making collared shirts, last year Bellbird posted (only on instagram I think) an offbeat collared shirt, Blaire by Style Arc, that I thought was so lovely, I had to give it a try. I bought this “wrong way” striped Italian shirting last year, and I thought this would be the perfect candidate. I saw the fabric at Loom, and after leaving the store without buying it, went back the next day because I kept thinking about it. Unfortunately, they only had 1 yard left!

style_arc_blaire_front2

I set out to make the dress version, but I thought it looked too “hospital gown-y,” so I opted to rip out the bottom half (and the topstitched pockets…) and recut it into the shirt version. I think this is a better use of the stripes since I cut the under panels the wrong way.

style_arc_blaire_back

This was overall medium-hard to sew. The directions had a lot of typos that made it very confusing, but I muddled through. The hardest part was hemming the curves on the shirt. I don’t think I did the best job… oh well. I think I have finally learned my lesson about matching the thread to the project, I am sad about how bad the white thread sticks out, especially on the dark Liberty-print inner collar stand. This fabric was not forgiving with ripping out stitches, so I left it, but in the future I pledge to always match each bobbin’s thread to the corresponding fabric!

style_arc_blaire_frontOne other note– the pattern specifies 3/8″ seam allowances, but I used french seams throughout. Since this is such a boxy fit, I thought it would work out fine to have a little extra seam allowance in there. The only thing I didn’t account for was sewing the sleeve cuffs with the extra allowance, too, so they lined up with the sleeves.

Overall, loving it!

style_arc_blaire_side1

Acton Dress

I made an Acton dress! I’ve been eyeing this pattern up for a long time, and finally decided to go for it… with some lovely gray “luxe” linen and some super-fun Liberty I bought during our LA trip at The Fabric Store.

acton_dress_front

acton_dress_front_2

I rode my bike to the Phipps since it was so nice out (!!), but I think it made the dress extra rumpled for these photos, especially in the bust and waist.

acton_dress_back

I was pretty meticulous about lining up seams and making sure everything looked perfect, but was in a rush to finish sewing the straps, so I neglected to realize I did not line them up correctly. The top back also didn’t line up! Wow what a miss. It was surprisingly easy to perform surgery through the lining to fix it this morning, though.

acton_dress_detail_3

acton_dress_detail_1

acton_dress_detail_2.JPG

… see? All better now.

The instructions for this pattern were GREAT!!! I loved the technique of sewing the lining to the center back seam, it was so easy and looks really professional. I usually hand-sew the lining at the zipper, but this looks better and is more sturdy. Speaking of the zipper…. my local fabric store didn’t have a grey zipper, so I went purple, and I really like it. It peeks out a tiny bit when I am wearing it, but its so fun! Overall, this is a great pattern… it is a tiny bit unflattering in the waist area, but I think I made it a skosh too tight. I made a bodice muslin in a straight size D, and then ended up taking in the side seams by 1″ on the final fabric’s side front and side back bodice (and as a result,I had to take in the skirt side seam 1″ in at the waist and grade out to the size D). Next time, I think I will take it in 1/2″ or so instead, so there’s more wiggle room.

acton_dress_back_2

Thanks to Claire and Kelsey for taking some impromptu photos at the Phipps yesterday!

Bertoia Chair Cushions

A few weeks ago I happened upon some kelly green Knoll Bertoia chairs at Construction Junction. I had been looking around for some dining chairs to replace our benches for months, and was having trouble finding something that hit the spot perfectly between stylish, comfortable and not insanely expensive. I was scrolling through instagram and saw that CJ had received a generous donation of 29 Knoll chairs, and I lost all ability to concentrate the rest of the day at work. I left work early to buy them, and its a good thing I did. I purchased them and had to come back with Jacob’s car, and by the time I got back the rest of the lot was gone. The four chairs I snagged were a little (a lot) dirty, but I washed them up with some dish soap and a scrub brush and they all came pretty clean. One chair has some rust / damage on the legs (you can see its the bottom left one below), but otherwise they are great!

bertoia_chair_cushion2.jpg

I knew these needed cushions, but I didn’t want to spend the $$$$ on real Knoll ones since they are so expensive. I didn’t see too many ideas out there about how to make your own, but I did find this post with some clues on how to draft a pattern that matches the original pads pretty closely.

bertoia_chair_cushion1.jpg

bertoia_chair_cushion5.jpg

I drew up my version in Illustrator, printed it and went for it. Jacob picked out some beige/green/red striped upholstery fabric at Mood during our LA trip, and I had just enough to cut 4 pads worth, plus bias tape to bind the edges. I filled each cushion with 2 pieces of 1″ thick batting. I machine-stitched the first seam on the edges, and then hand-sewed the other side shut. So far so good, we will see how they hold up!

PS I got some clip-on felt glides for the bottom of these. They are really hard to put on, but I think it will help keep them in good shape.

bertoia_chair_cushion3.jpg

bertoia_chair_cushion4.jpg


A Warm Weather Escape

Jacob and I finally took a trip to LA. We had both never been! We stayed with our friend Claire, who was the best hostess and tour guide (thanks, Claire!!). She showed us so much in a long weekend: the Hollyhock House, Rand, Santa Monica beach, Venice beach, the Getty, Monterey Park, The Fabric Store, Mood, and SO MUCH MORE! We left Pittsburgh’s 15 degree winter snowscape and embraced the mid 70s and sun. It did rain the first day, but it was still glorious to not wear socks and a winter coat.

I also used this opportunity of good weather + nice camera to coerce Jacob into getting some shots of 2 me-made things I have not had a chance to photograph before now (thank you honey!).

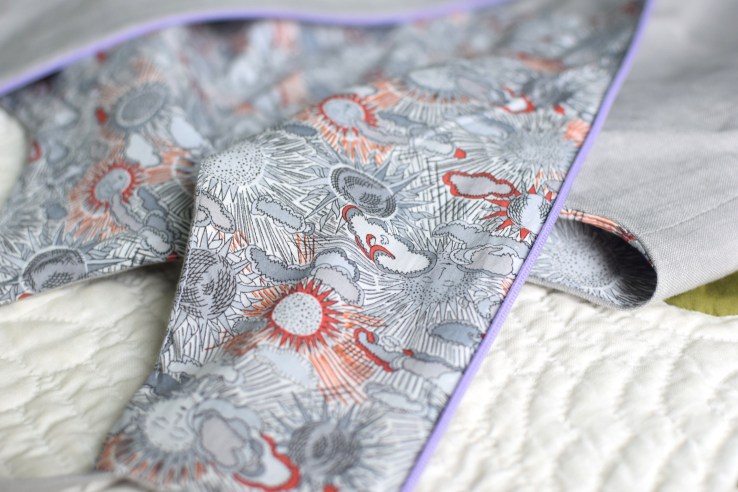
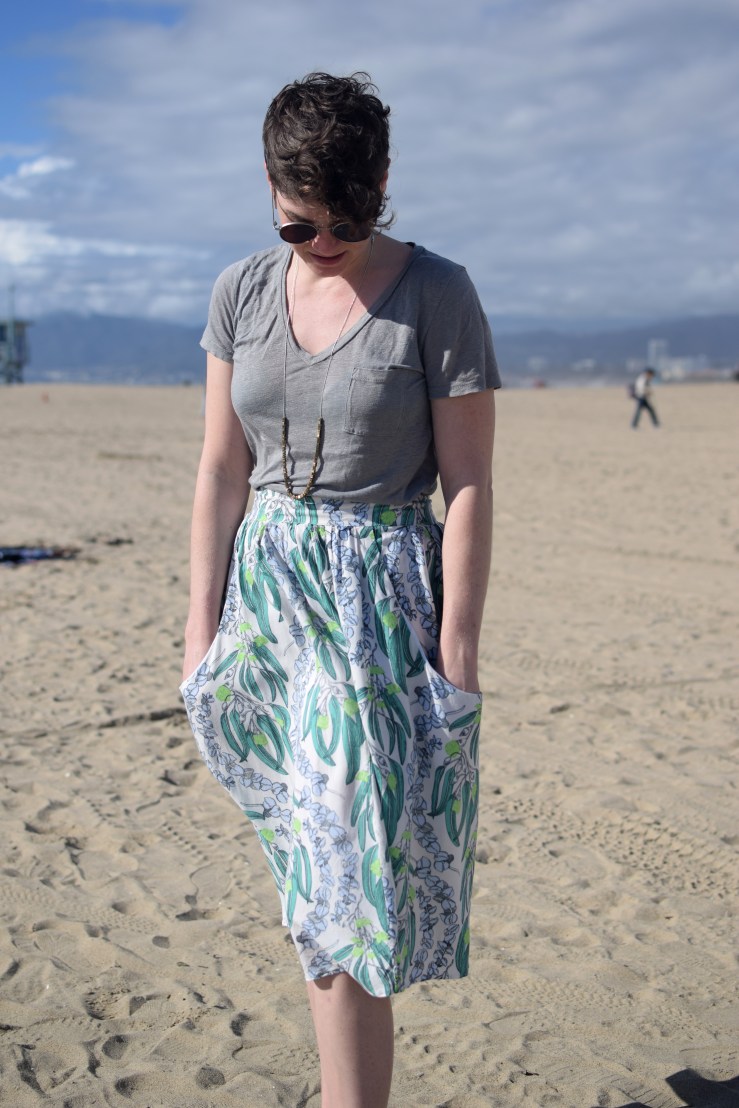
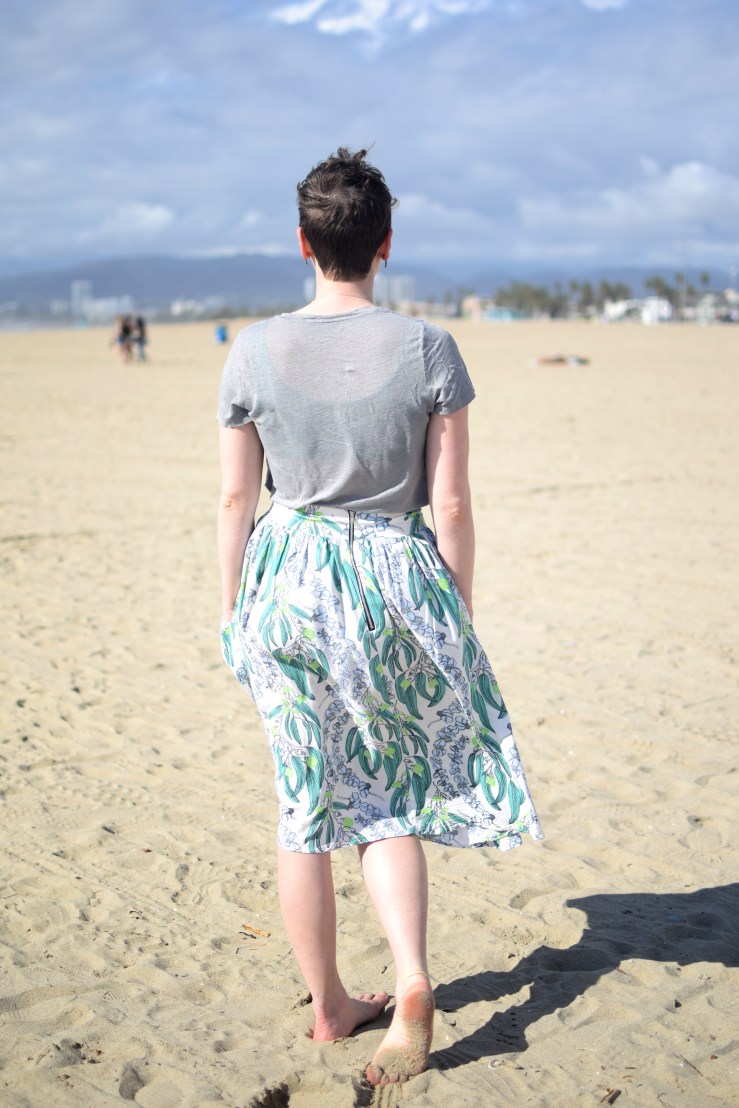
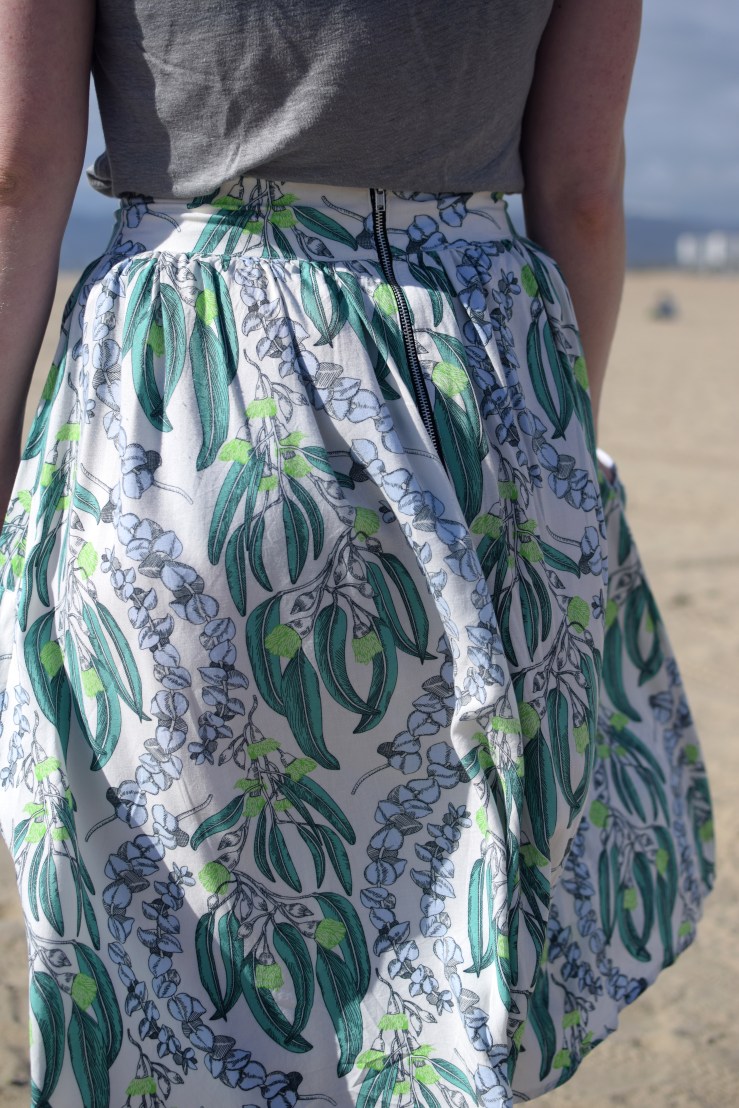
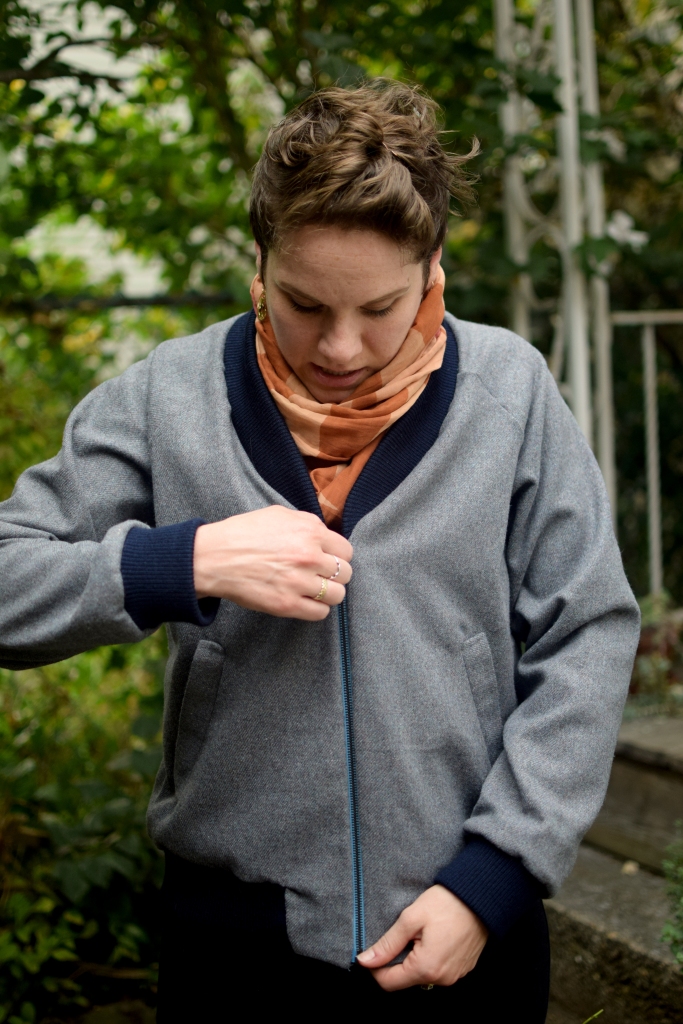
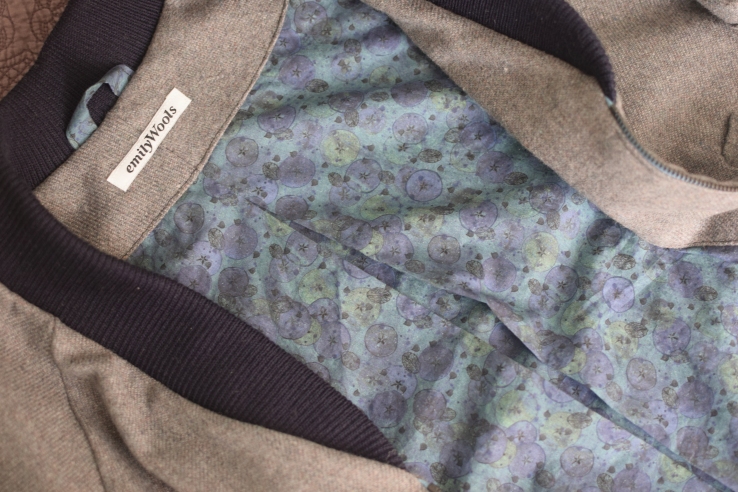
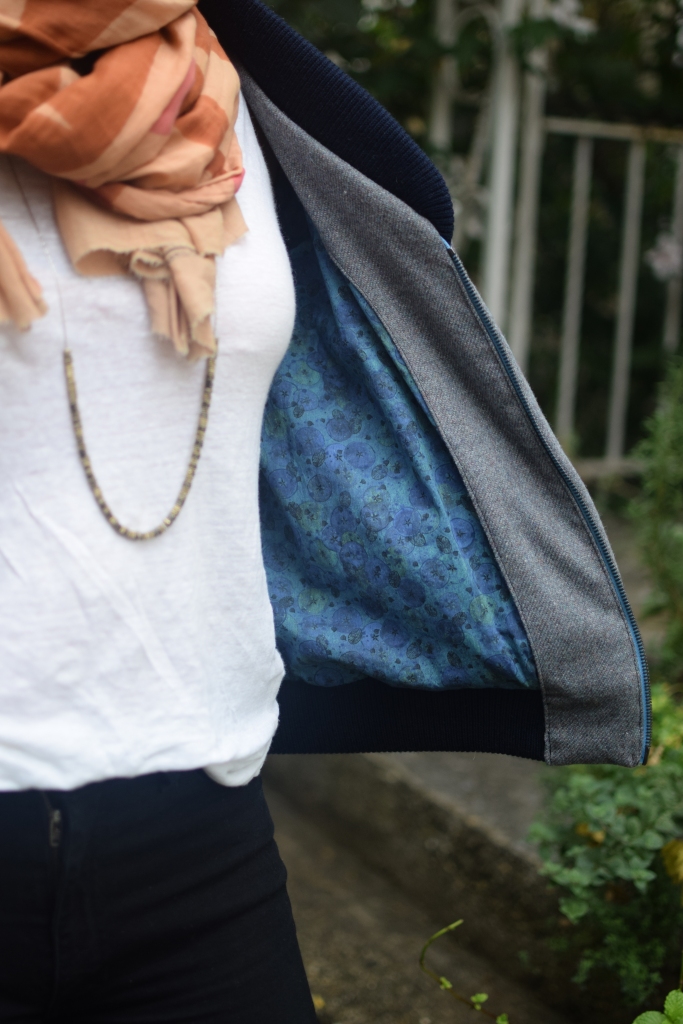
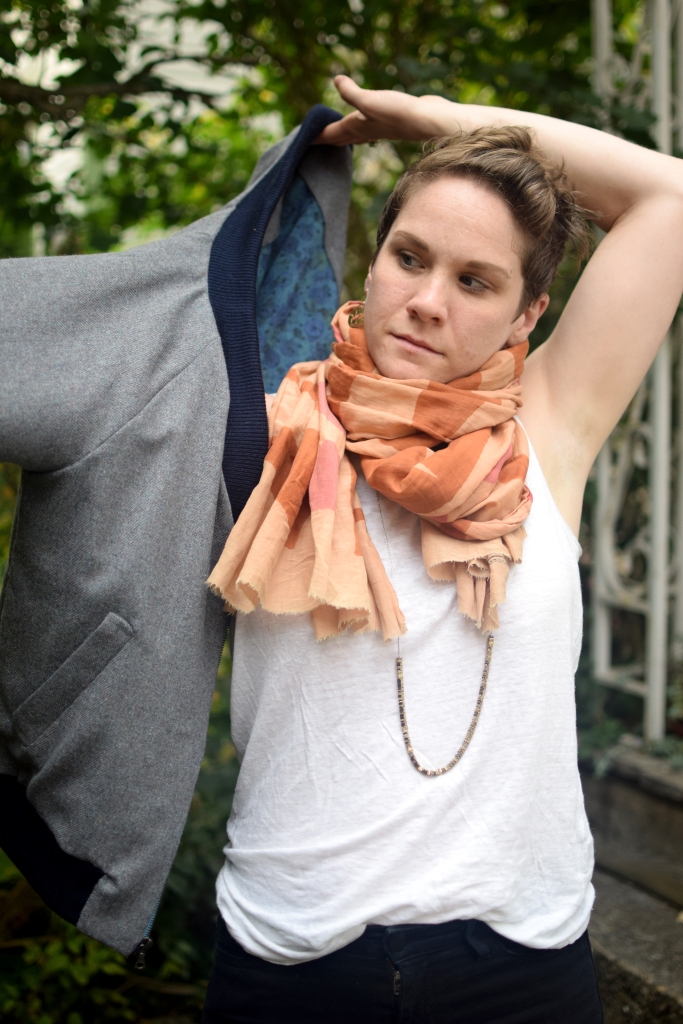
Here is a Brumby I made last summer from some Anna Marie Horner rayon challis. I accidentally used FABRIC STABILIZER instead of interfacing because I had an unlabeled pile of each next to each other. I didn’t realize my mistake until I had finished. Oops. I did the exposed zipper, using Megan’s super clear instructions, and I like the resulting “grittiness” of it contrasted with the sweetness of the print. Great for a spring day, or any day in LA, apparently. These were taken somewhere between the Santa Monica Pier and Venice Beach.

DSC_3067.JPGdsc_3054DSC_3076.JPGdsc_3032

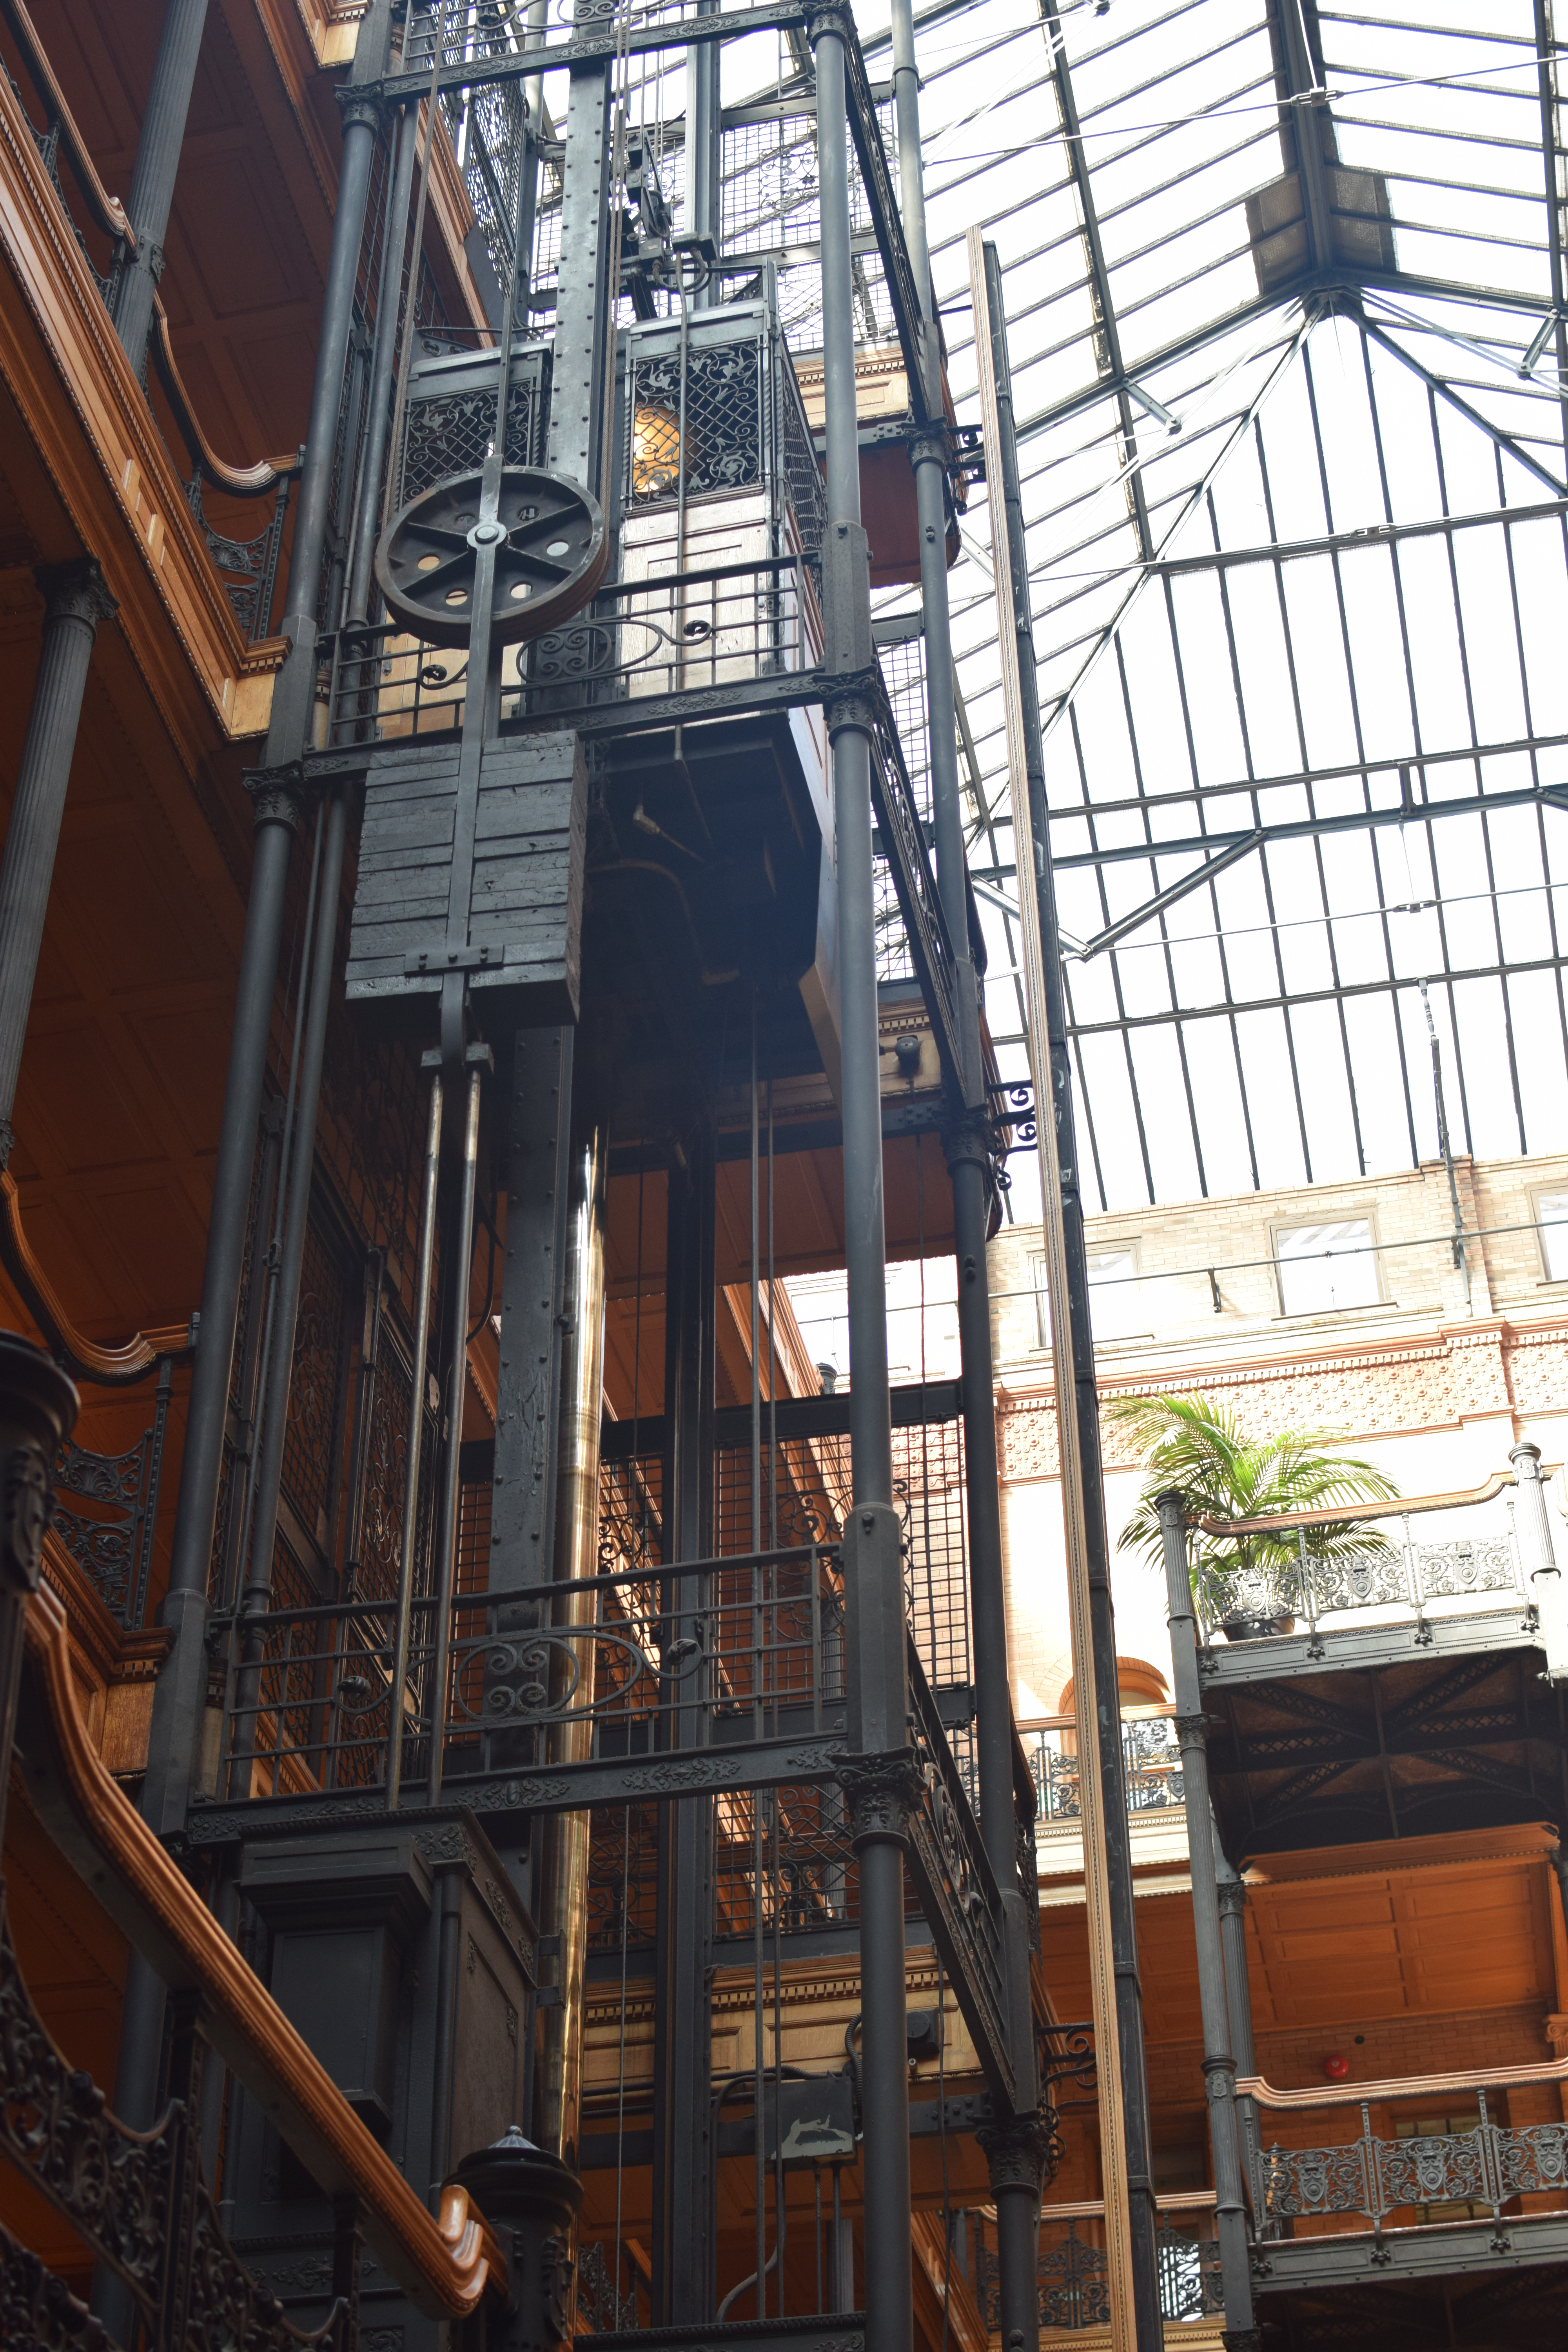
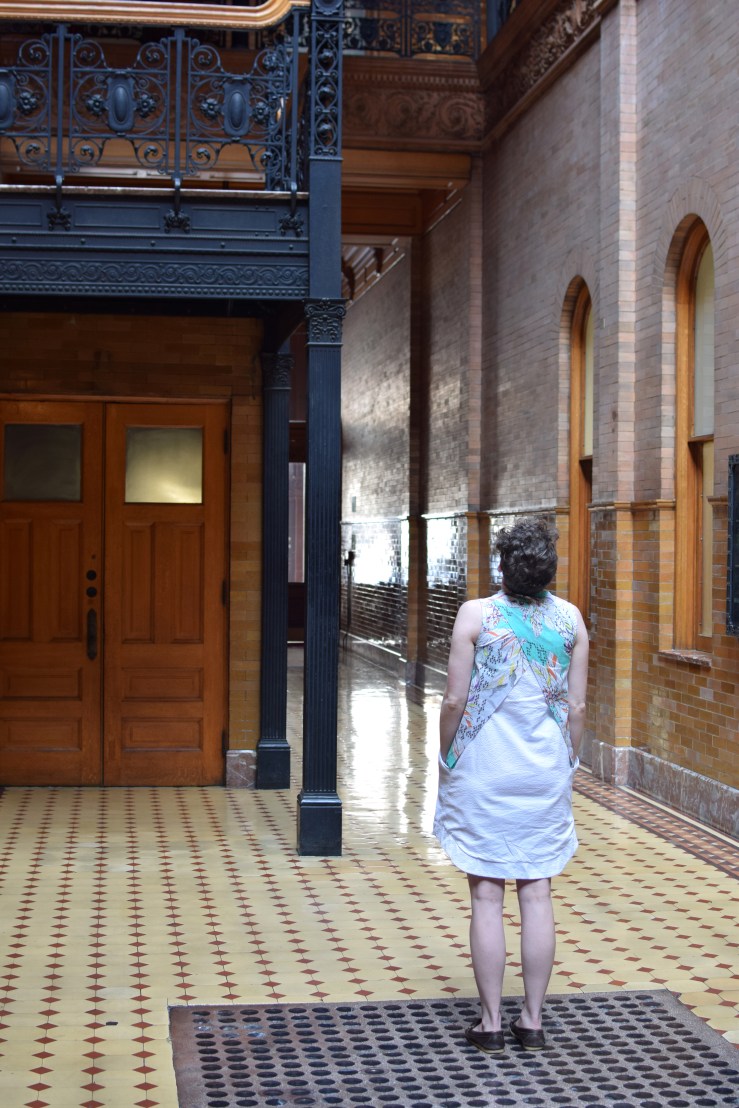
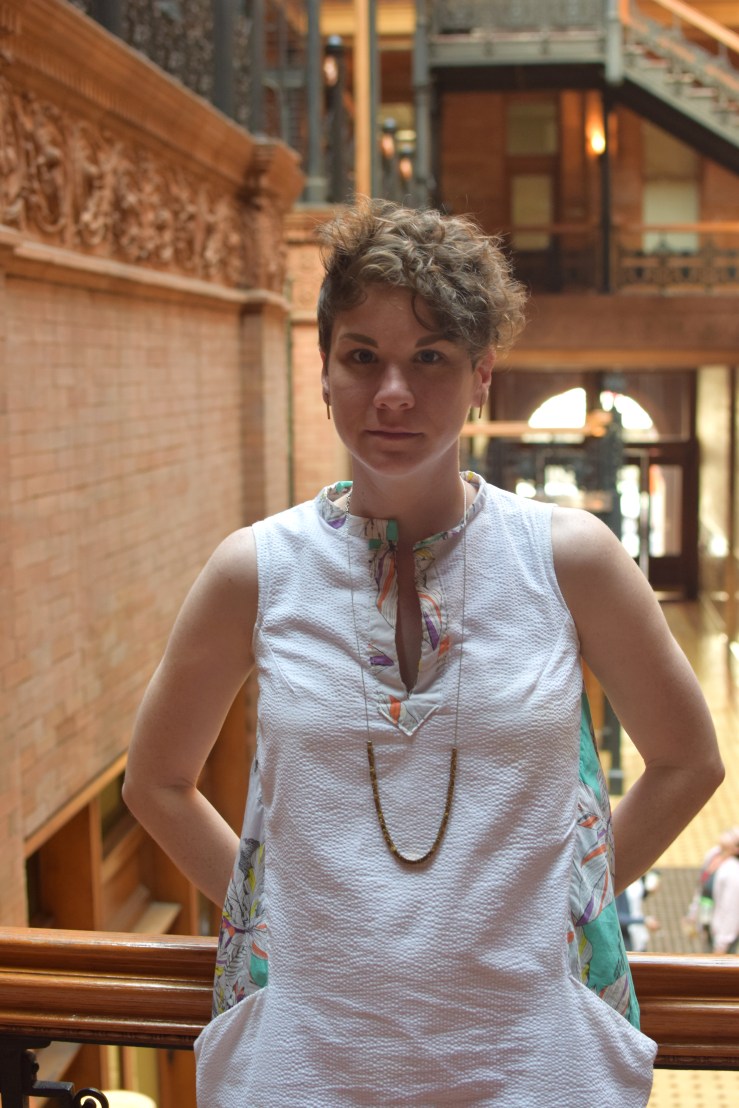
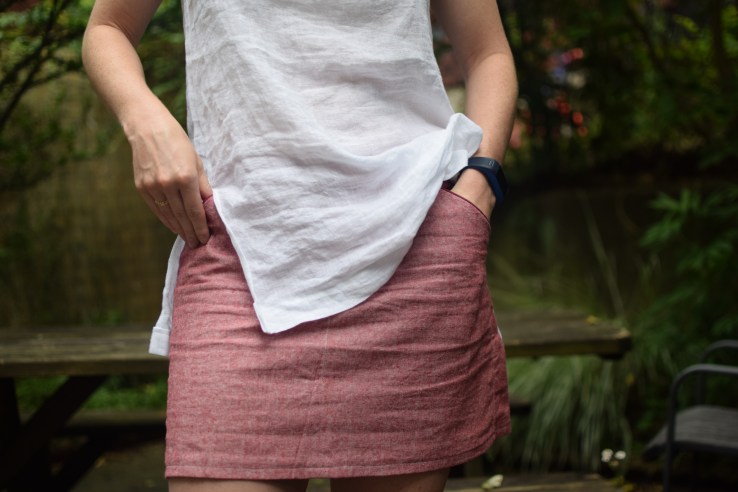
Claire got some pics of my Hannah Dress in the Bradbury building! This building is breathtaking, even though you are only allowed in part of the lobby. I was not expecting to be so blown away, but wow, what amazing craftsmanship. New construction just isn’t the same. The day before we went to the Getty, which is also incredibly impressive, but just does not hold a candle to work like this.

DSC_3175.JPG

DSC_3179.JPG

I had a really cumbersome time making this dress (as I mentioned in a previous post). I changed the front neckline, I did not care for the placket. I think if I make it again, I would go up a size in the shoulders/bust, its pretty tight there. It is a very comfortable dress (except for the shoulder fit), and the pockets are fun to hang out in, but I don’t think it is terribly flattering on me, it certainly doesn’t really photograph too well. So, not sure if I will end up making it again. It is silly to say, I guess, but I wish the back darts weren’t covered by the criss-cross overlay.

DSC_3176.JPG
dsc_3180dsc_3183

Well there ya go. Great weather, great company and great food! What more can you ask for in a trip?
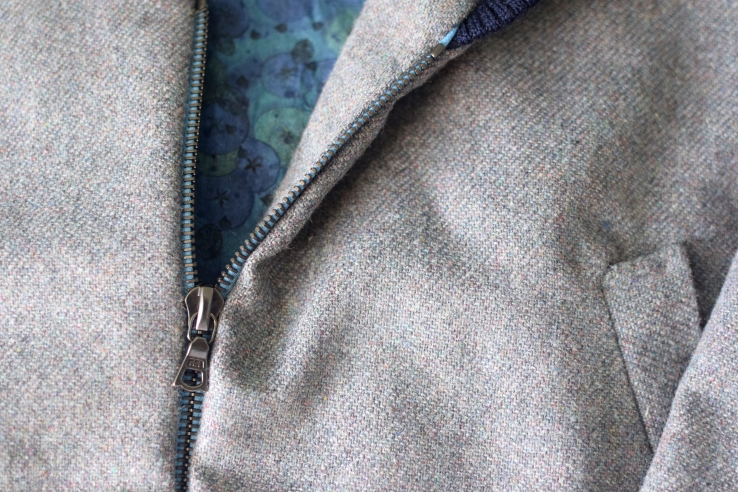
Dove/Salt and Pepper.

I had some leftover linen from Joann’s and I decided to use it to make a trial Dove top. I really would like to make the bell sleeve version, I just haven’t found enough of the right fabric yet. The shape of the top is very “modern” and its loose in a way that makes me feel like I am trying with my outfit. I took a page out of Elizabeth Suzann’s book and am considering linen a year-round fabric, instead of just for summer, and I am trying to embrace the wrinkles.dsc_1827dsc_1828

dsc_1798
Totally embracing the wrinkles here.

I used some leftover Liberty of London for the facings, and I used the beautiful selvedge edges where I could, like in the center front seam. Why are linen selvedges always so whimsical?

dsc_1790dsc_1806

While we were on our family beach walk, I found some awesome silver dollar plants growing in the brush. I snuck in to get some.

dsc_1841dsc_1845

The cowl is based on Purl Soho’s Salt and Pepper cowl. I sort of just followed the spirit of the cowl, the idea of two yarns, alternating rows, and using one yarn for the ribbing. I used some hand spun alpaca yarn from my friend’s mom’s farm, and the white is some luxurious cashmere I’ve been saving. I made a pair of mittens from the alpaca last year, and I wanted this to match them. In the past, I think I’ve gone crazy with colors, and want to make more neutrals so I don’t look so wacky when I wear my hand knits.

Yay for family beach walks!

dsc_1787

Thank you to Jacob for taking these beautiful pics!


Autumn.

A few weeks ago, Grainline posted Sarah’s “fall wardrobe inspiration” and I was quite smitten with the Steven Alan dress she featured. I decided to hack the Archer shirt into a homage to that dress with some vintage plaid I’ve been saving. I added a very slight a-line shape to the dress, and made a shirttail hem. I planned to put in the patch pockets, but just never got around to it. I could hack apart the side seams and do it, if I really want to. I thought it looked a little blah when I was done, especially in the waist, so I added a bias-cut channel and created a drawstring waist. Its a teeny bit short but I am really happy with how it turned out; I think it will be great for autumn. Buttons are blackened brass from Fringe Supply Co. archer shirtdressarcher shirtdressarcher shirtdress

Also finally got around to photographing my Stonecutters cardigan by Amy Christoffers. I finished this in late winter last year and didn’t have much of a chance to wear it before it warmed up. I LOVE it and I am so happy with the Imperial Stock Ranch Columbia yarn.stonecutters cardiganstonecutters cardiganstonecutters cardigan

Two New Dresses

Hannah Dress by Victory Patterns

I really want to like this. Its a very very fussy pattern, it uses a ton of fabric, and it took a surprising amount of time to make. Full disclosure, I did not focus enough on the match points– if you decide to make this, BE SURE TO BE VERY PRECISE HERE. The pattern says this and I fault no one but myself here. I think I am going to rip out the placket and replace with a more tunic-like finish I ripped out the placket and replaced it with a more open v-neck(à la Hello Bear ). I like it much better this way, the original placket kept flopping around and was too stiff.

hannah dress by victory patterns

I underlined the white seersucker with some Bemberg lining, which I am glad I did because this fabric is pretty see-through. The pockets are great, the perfect depth to just rest your hands in. I do not know if I will make it again. One note if I do is the high bust/shoulders are quite tight, perhaps I should grade that part of the pattern up a size– it fits well everywhere else and would not want the rest any bigger.

Will get some more on-body pics soon!!!!

Next: Tea House Dress by Sew House 7.

tea house dress by sew house 7tea house dress by sew house 7I almost made this from a vintagey plaid I found at the Center for Creative Reuse, but I have my heart set on making that into another Archer or an Alder instead. I laid out the pattern pieces on the plaid and took pause. I remembered that I had almost 3 yards of that wax-print leftover from the Inari Tee. I set to work finagling around the pattern pieces, but I just didn’t have enough. I had to patch the front shoulder on one of the pieces to have enough fabric. I went to Loom Morningside to see if they had any fabric that would work. I thought of using black fabric for the yokes and ties, but that just seemed so BORING. One of the lovely ladies at Loom helped me find a hand-printed cotton that was similar in drape (read: none) to what I was already using. Back at home, halfway through making it I was having serious doubts about whether or not it would work, but I kept on going. I put it on when it was finished and showed my husband and he LOVED it (huge confidence boost, he is very honest with me about these things), so I think I do, too.

This is a pretty easy to follow pattern. I love the pockets! Only thing I changed was I hemmed it 3″, which I am glad I did, I really love deep hems, and now the dress hits above my knee. It does feel similar to my other “Japanese style” dresses I’ve made, but the waist ties help it feel more feminine. I think I will make it again, probably in a more subtle fabric next time.